ElasticSearch
黑马商城作为一个电商项目,商品的搜索肯定是访问频率最高的页面之一。目前搜索功能是基于数据库的模糊搜索来实现的,存在很多问题。
首先,查询效率较低。
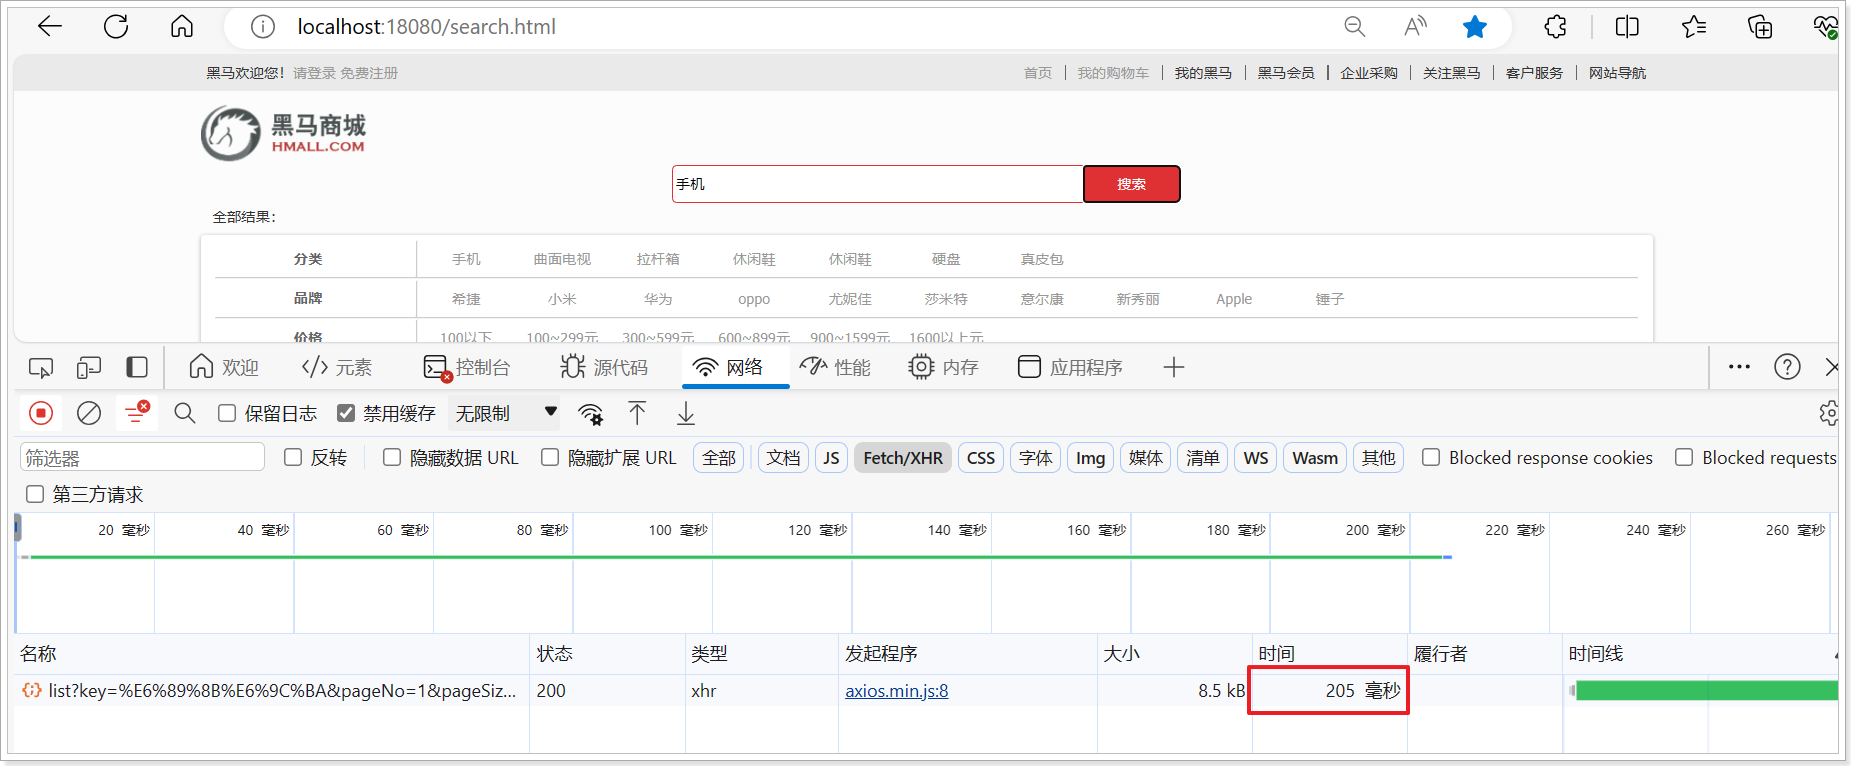
由于数据库模糊查询不走索引,在数据量较大的时候,查询性能很差。黑马商城的商品表中仅仅有不到9万条数据,基于数据库查询时,搜索接口的表现如图:
需要注意的是,数据库模糊查询随着表数据量的增多,查询性能的下降会非常明显,而搜索引擎的性能则不会随着数据增多而下降太多。目前仅10万不到的数据量差距就如此明显,如果数据量达到百万、千万、甚至上亿级别,这个性能差距会非常夸张。
其次,功能单一
数据库的模糊搜索功能单一,匹配条件非常苛刻,必须恰好包含用户搜索的关键字。而在搜索引擎中,用户输入出现个别错字,或者用拼音搜索、同义词搜索都能正确匹配到数据。
综上,在面临海量数据的搜索,或者有一些复杂搜索需求的时候,推荐使用专门的搜索引擎来实现搜索功能。
目前全球的搜索引擎技术排名如下:

排名第一的就是我们今天要学习的elasticsearch.
elasticsearch是一款非常强大的开源搜索引擎,支持的功能非常多,例如:代码搜索、商品搜索、综合搜索、地图搜索等。
另外,elasticsearch还有关联的一整套技术栈,包含Kibana、Logstash等组件,称为ELK。被广泛应用在日志数据分析、系统实时监控等领域。而elasticsearch则是这套组件中的核心:

因此,课堂中我们专注于elasticsearch的学习即可。
通过今天的学习大家要达成下列学习目标:
- 理解倒排索引原理
- 会使用IK分词器
- 理解索引库Mapping映射的属性含义
- 能创建索引库及映射
- 能实现文档的CRUD
1、初识ElasticSearch
Elasticsearch是一个基于Apache Lucene库实现的,Restful风格的,分布式搜索和数据分析引擎。基于倒排索引技术,实现了高性能的全文检索和数据分析功能。官方网站如下:
https://www.elastic.co/cn/elasticsearch/
本章我们先安装ES;然后再初步了解一下Elasticsearch的基本原理和一些基础概念。
1.1、安装
我们要安装的内容包含如下部分:
首先Elasticsearch不用多说,是提供核心的数据存储、搜索、分析功能的。
然后是Kibana,Elasticsearch对外提供的是Restful风格的API,任何操作都可以通过发送http请求来完成。不过http请求的方式、路径、还有请求参数的格式都有严格的规范。这些规范我们肯定记不住,因此我们要借助于Kibana这个服务。
Kibana是elastic公司提供的用于操作Elasticsearch的可视化控制台。它的功能非常强大,包括:
- 对Elasticsearch数据的搜索、展示
- 对Elasticsearch数据的统计、聚合,并形成图形化报表、图形
- 对Elasticsearch的集群状态监控
- 它还提供了一个开发控制台(DevTools),在其中对Elasticsearch的Restful的API接口提供了语法提示
1.1.1、安装ElasticSearch
通过下面的Docker命令即可安装单机版本的elasticsearch:
 1
 2
 3
 4
 5
 6
 7
 8
 9
10
11
|
docker run -d \
  --name es \
  -e "ES_JAVA_OPTS=-Xms512m -Xmx512m" \
  -e "discovery.type=single-node" \
  -v es-data:/usr/share/elasticsearch/data \
  -v es-plugins:/usr/share/elasticsearch/plugins \
  --privileged \
  --network hm-net \
  -p 9200:9200 \
  -p 9300:9300 \
  elasticsearch:7.12.1
|
注意,这里我们采用的是elasticsearch的7.12.1版本,由于8以上版本的JavaAPI变化很大,在企业中应用并不广泛,企业中应用较多的还是8以下的版本。
如果拉取镜像困难,可以直接导入资料/es.tar提供的镜像tar包。
安装完成后,访问 192.168.12.168:9200 ,即可看到响应的Elasticsearch服务的基本信息:
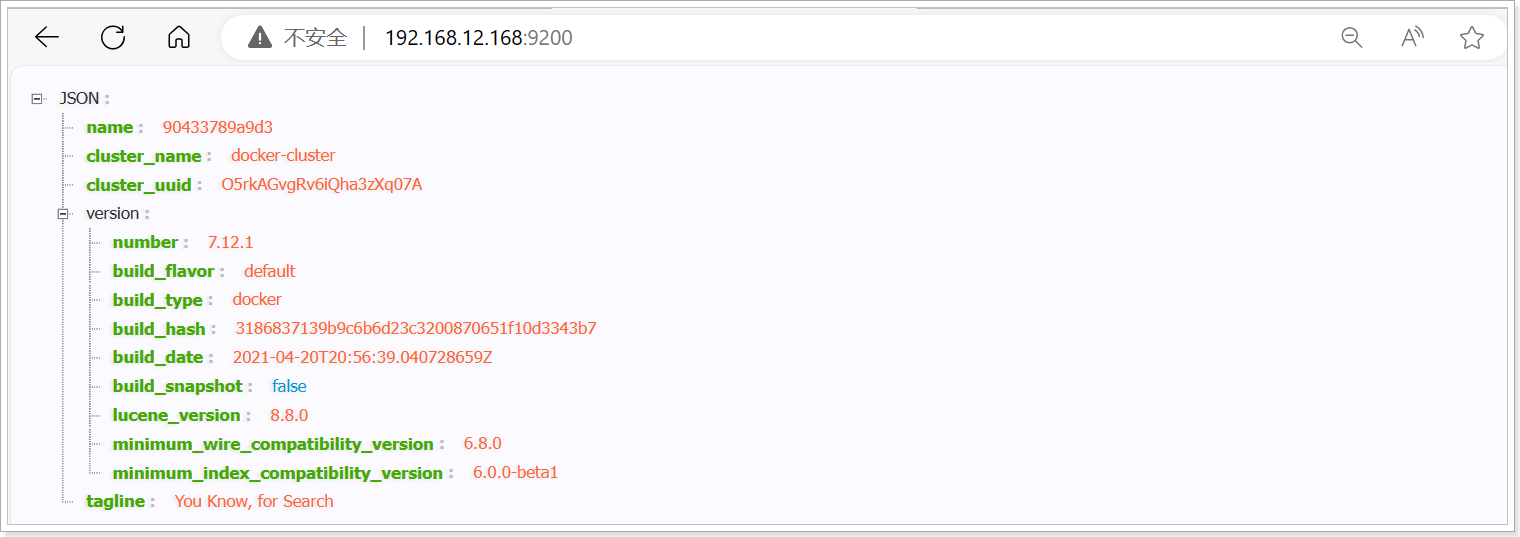
见到上述信息说明安装es成功。
1.1.2、安装Kibana
通过下面的Docker命令,即可部署Kibana:
1
2
3
4
5
6
|
docker run -d \
--name kibana \
-e ELASTICSEARCH_HOSTS=http://es:9200 \
--network=hm-net \
-p 5601:5601  \
kibana:7.12.1
|
如果拉取镜像困难,可以直接导入资料/kibana.tar提供的镜像tar包。
安装完成后,直接访问 http://192.168.12.168:5601/,即可看到控制台页面:
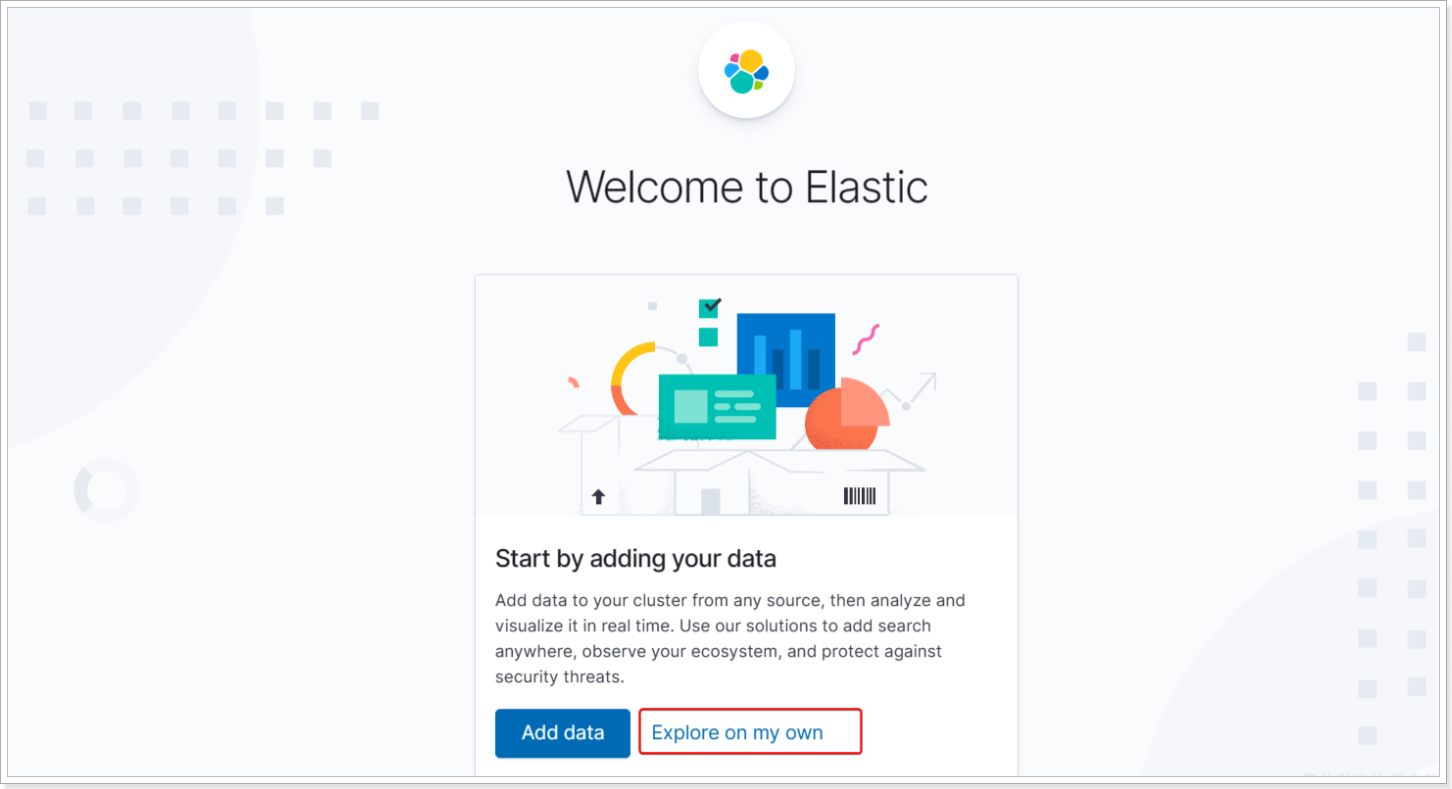
选择Explore on my own之后,进入主页面:
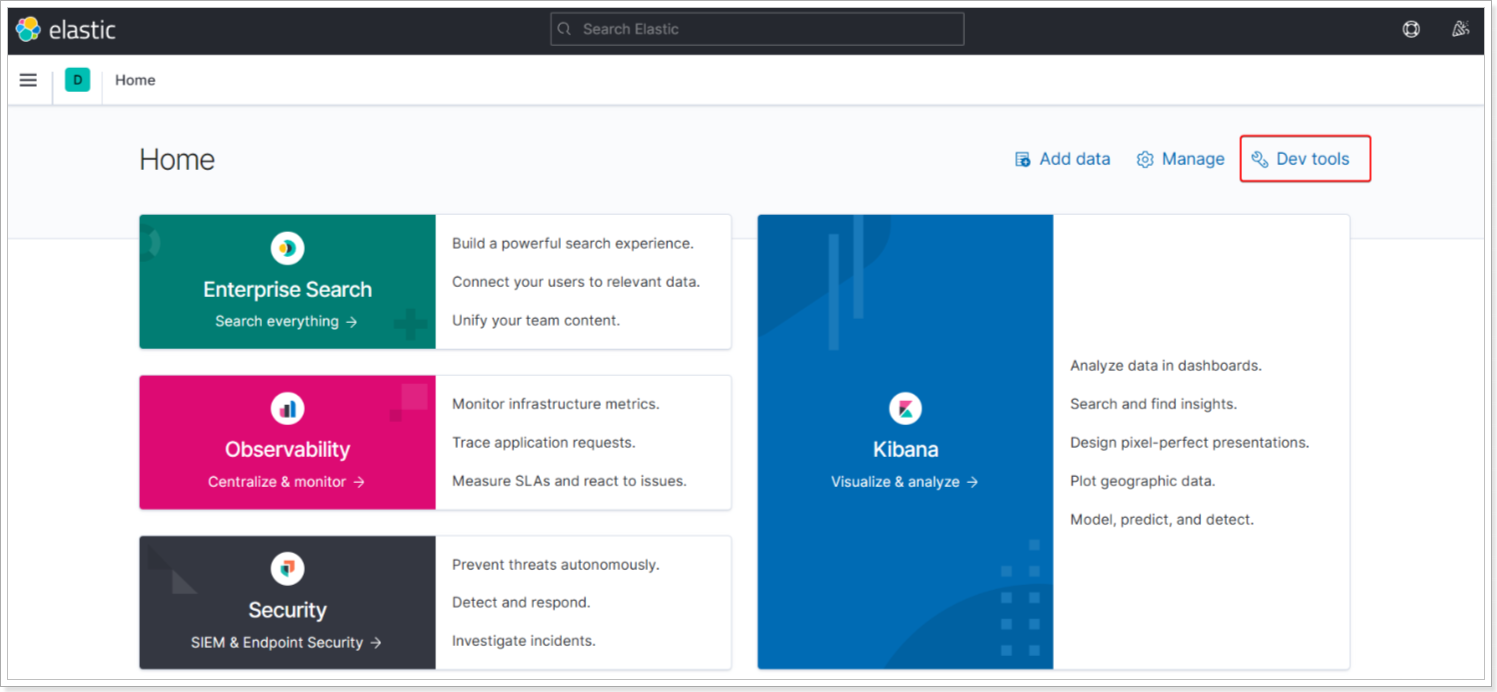
然后选中Dev tools,进入开发工具页面:

1.2、倒排索引
elasticsearch之所以有如此高性能的搜索表现,正是得益于底层的倒排索引技术。那么什么是倒排索引呢?
倒排索引的概念是基于MySQL这样的正向索引而言的。
1.2.1、正向索引
我们先来回顾一下正向索引。
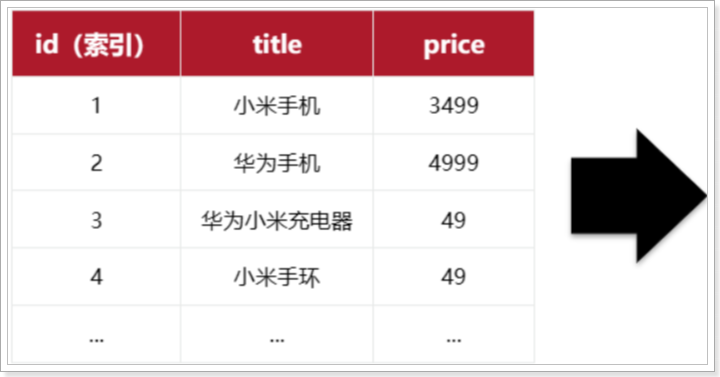
例如有一张名为tb_goods的表:
| id |
title |
price |
| 1 |
小米手机 |
3499 |
| 2 |
华为手机 |
4999 |
| 3 |
华为小米充电器 |
49 |
| 4 |
小米手环 |
49 |
| … |
… |
… |
其中的id字段已经创建了索引,由于索引底层采用了B+树结构,因此我们根据id搜索的速度会非常快。但是其他字段例如title,只在叶子节点上存在。
因此要根据title搜索的时候只能遍历树中的每一个叶子节点,判断title数据是否符合要求。
比如用户的SQL语句为:
1
|
select * from tb_goods where title like '%手机%';
|
那搜索的大概流程如图:
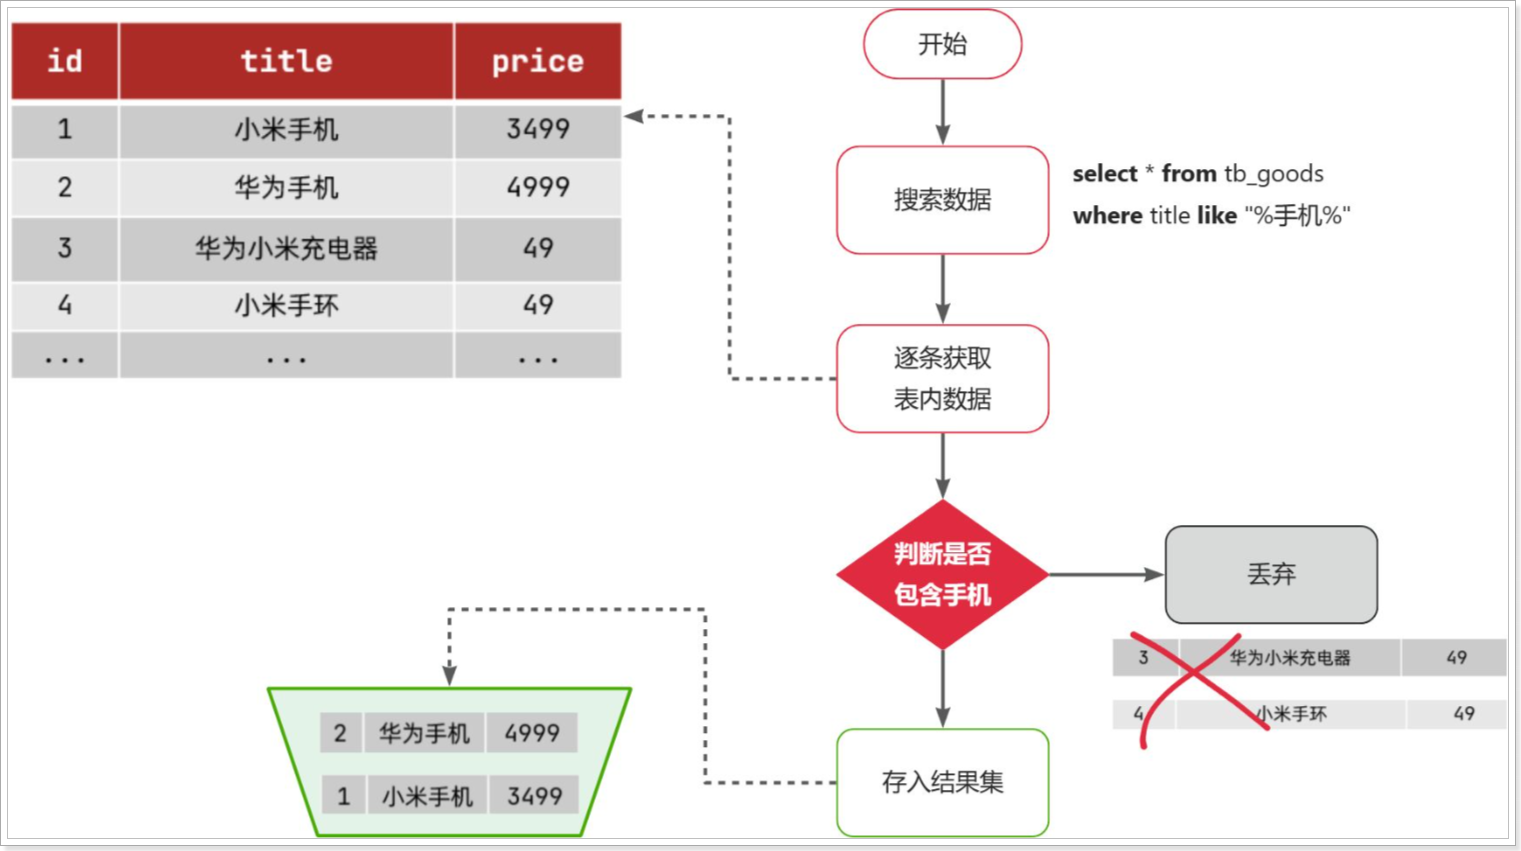
说明:
- 1)检查到搜索条件为
like '%手机%',需要找到title中包含手机的数据
- 2)逐条遍历每行数据(每个叶子节点),比如第1次拿到
id为1的数据
- 3)判断数据中的
title字段值是否符合条件
- 4)如果符合则放入结果集,不符合则丢弃
- 5)回到步骤1
综上,根据id精确匹配时,可以走索引,查询效率较高。而当搜索条件为模糊匹配时,由于索引无法生效,导致从索引查询退化为全表扫描,效率很差。
正向索引:以文档的ID为关键字,表中记录文档中每个字的位置信息,查找时扫描表中每个文档中字的信息直到找出所有包含查询关键字的文档
因此,正向索引适合于根据索引字段的精确搜索,不适合基于部分词条的模糊匹配。
而倒排索引恰好解决的就是根据部分词条模糊匹配的问题。
1.2.2、倒排索引
倒排索引中有两个非常重要的概念:
- 文档(
Document):用来搜索的数据,其中的每一条数据就是一个文档。例如一个网页、一个商品信息
- 词条(
Term):对文档数据或用户搜索数据,利用某种算法分词,得到的具备含义的词语就是词条。例如:我是中国人,就可以分为:我、是、中国人、中国、国人这样的几个词条
创建倒排索引是对正向索引的一种特殊处理和应用,流程如下:
- 将每一个文档的数据利用分词算法根据语义拆分,得到一个个词条
- 创建表,每行数据包括词条、词条所在文档id、位置等信息
- 因为词条唯一性,可以给词条创建正向索引
此时形成的这张以词条为索引的表,就是倒排索引表,两者对比如下:
-
正向索引
| id(索引) |
title |
price |
| 1 |
小米手机 |
3499 |
| 2 |
华为手机 |
4999 |
| 3 |
华为小米充电器 |
49 |
| 4 |
小米手环 |
49 |
| … |
… |
… |
-
倒排索引
| 词条(索引) |
文档id |
| 小米 |
1,3,4 |
| 手机 |
1,2 |
| 华为 |
2,3 |
| 充电器 |
3 |
| 手环 |
4 |
倒排索引的搜索流程如下(以搜索"华为手机"为例),如图:
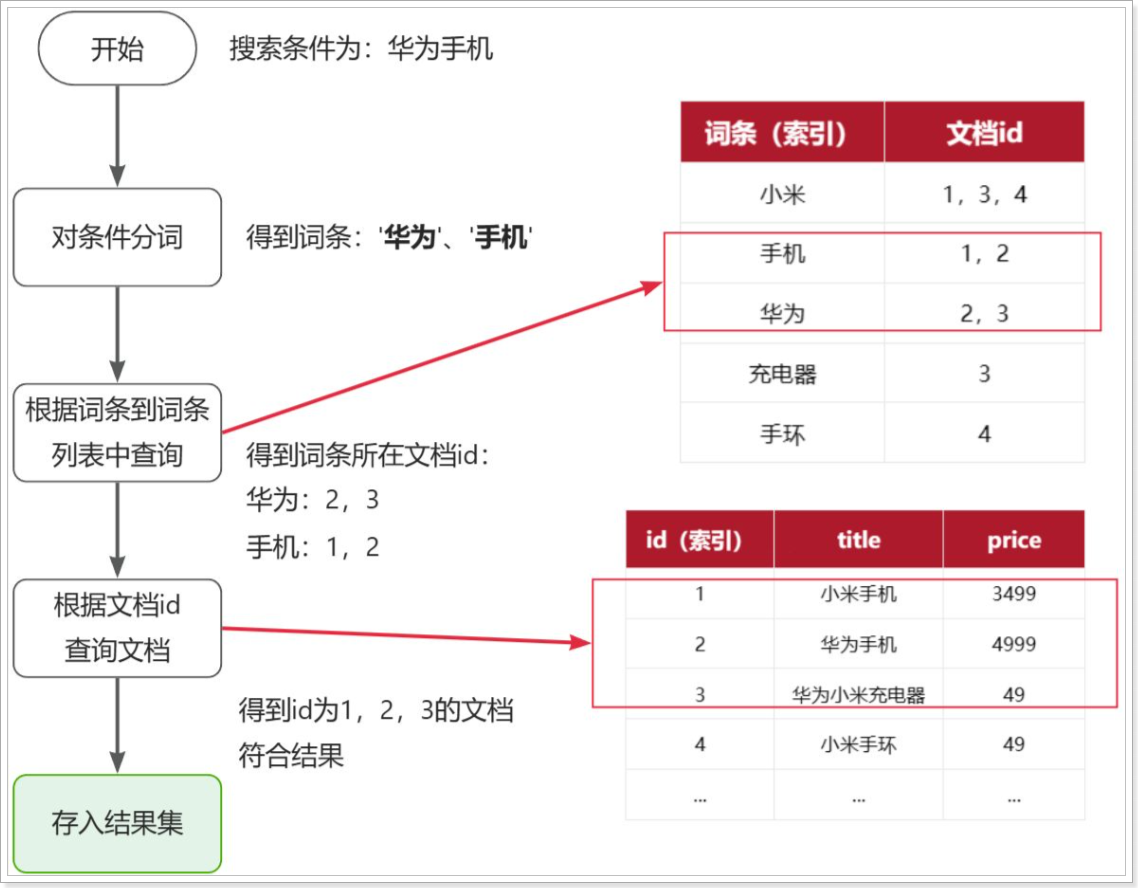
流程描述:
1)用户输入条件"华为手机"进行搜索。
2)对用户输入条件分词,得到词条:华为、手机。
3)拿着词条在倒排索引中查找(由于词条有索引,查询效率很高),即可得到包含词条的文档id:1、2、3。
4)拿着文档id到正向索引中查找具体文档即可(由于id也有索引,查询效率也很高)。
虽然要先查询倒排索引,再查询倒排索引,但是无论是词条、还是文档id都建立了索引,查询速度非常快!无需全表扫描。
1.2.3、正向和倒排
那么为什么一个叫做正向索引,一个叫做倒排索引呢?
- 正向索引是最传统的,根据id索引的方式。但根据词条查询时,必须先逐条获取每个文档,然后判断文档中是否包含所需要的词条,是根据文档找词条的过程。
- 而倒排索引则相反,是先找到用户要搜索的词条,根据词条得到保护词条的文档的id,然后根据id获取文档。是根据词条找文档的过程。
是不是恰好反过来了?
那么两者方式的优缺点是什么呢?
正向索引:
- 优点:
- 可以给多个字段创建索引
- 根据索引字段搜索、排序速度非常快
- 缺点:
- 根据非索引字段,或者索引字段中的部分词条查找时,只能全表扫描。
倒排索引:
- 优点:
- 缺点:
- 只能给词条创建索引,而不是字段
- 无法根据字段做排序
1.3、IK分词器
Elasticsearch的关键就是倒排索引,而倒排索引依赖于对文档内容的分词,而分词则需要高效、精准的分词算法,IK分词器就是这样一个中文分词算法。
1.3.1、安装IK分词器
方案一:在线安装(不推荐)
运行一个命令即可:
1
|
docker exec -it es ./bin/elasticsearch-plugin install https://github.com/medcl/elasticsearch-analysis-ik/releases/download/v7.12.1/elasticsearch-analysis-ik-7.12.1.zip
|
然后重启es容器:
方案二:离线安装
如果网速较差,也可以选择离线安装。
首先,查看之前安装的Elasticsearch容器的plugins数据卷目录:
1
|
docker volume inspect es-plugins
|
查看结果大概如下:
 1
 2
 3
 4
 5
 6
 7
 8
 9
10
11
12
|
[root@itheima ~]# docker volume inspect es-plugins
[
    {
        "CreatedAt": "2024-01-23T11:23:24+08:00",
        "Driver": "local",
        "Labels": null,
        "Mountpoint": "/var/lib/docker/volumes/es-plugins/_data",
        "Name": "es-plugins",
        "Options": null,
        "Scope": "local"
    }
]
|
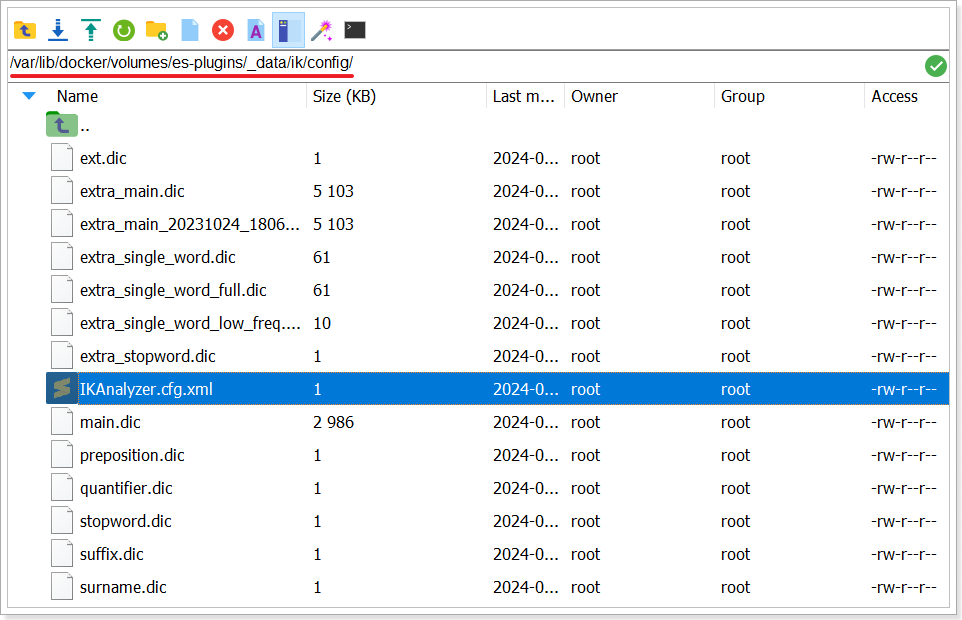
可以看到elasticsearch的插件挂载到了/var/lib/docker/volumes/es-plugins/_data这个目录。我们需要把IK分词器上传至这个目录。
找到 资料/elasticsearch-analysis-ik-7.12.1.zip提供的ik分词器插件,资料提供了7.12.1版本的ik分词器压缩文件,你需要对其解压(给大家的资料中已经解压好;不用解压了,也就是下面这幅图不用再做了。):
然后上传至虚拟机的/var/lib/docker/volumes/es-plugins/_data这个目录:

最后,重启es容器:
1.3.2、使用IK分词器
IK分词器包含两种模式:
ik_smart:智能语义切分ik_max_word:最细粒度切分
我们在Kibana的DevTools上来测试分词器,首先测试Elasticsearch官方提供的标准分词器:
1
2
3
4
5
|
POST /_analyze
{
  "analyzer": "standard",
  "text": "黑马程序员学习java太棒了"
}
|
结果如图:
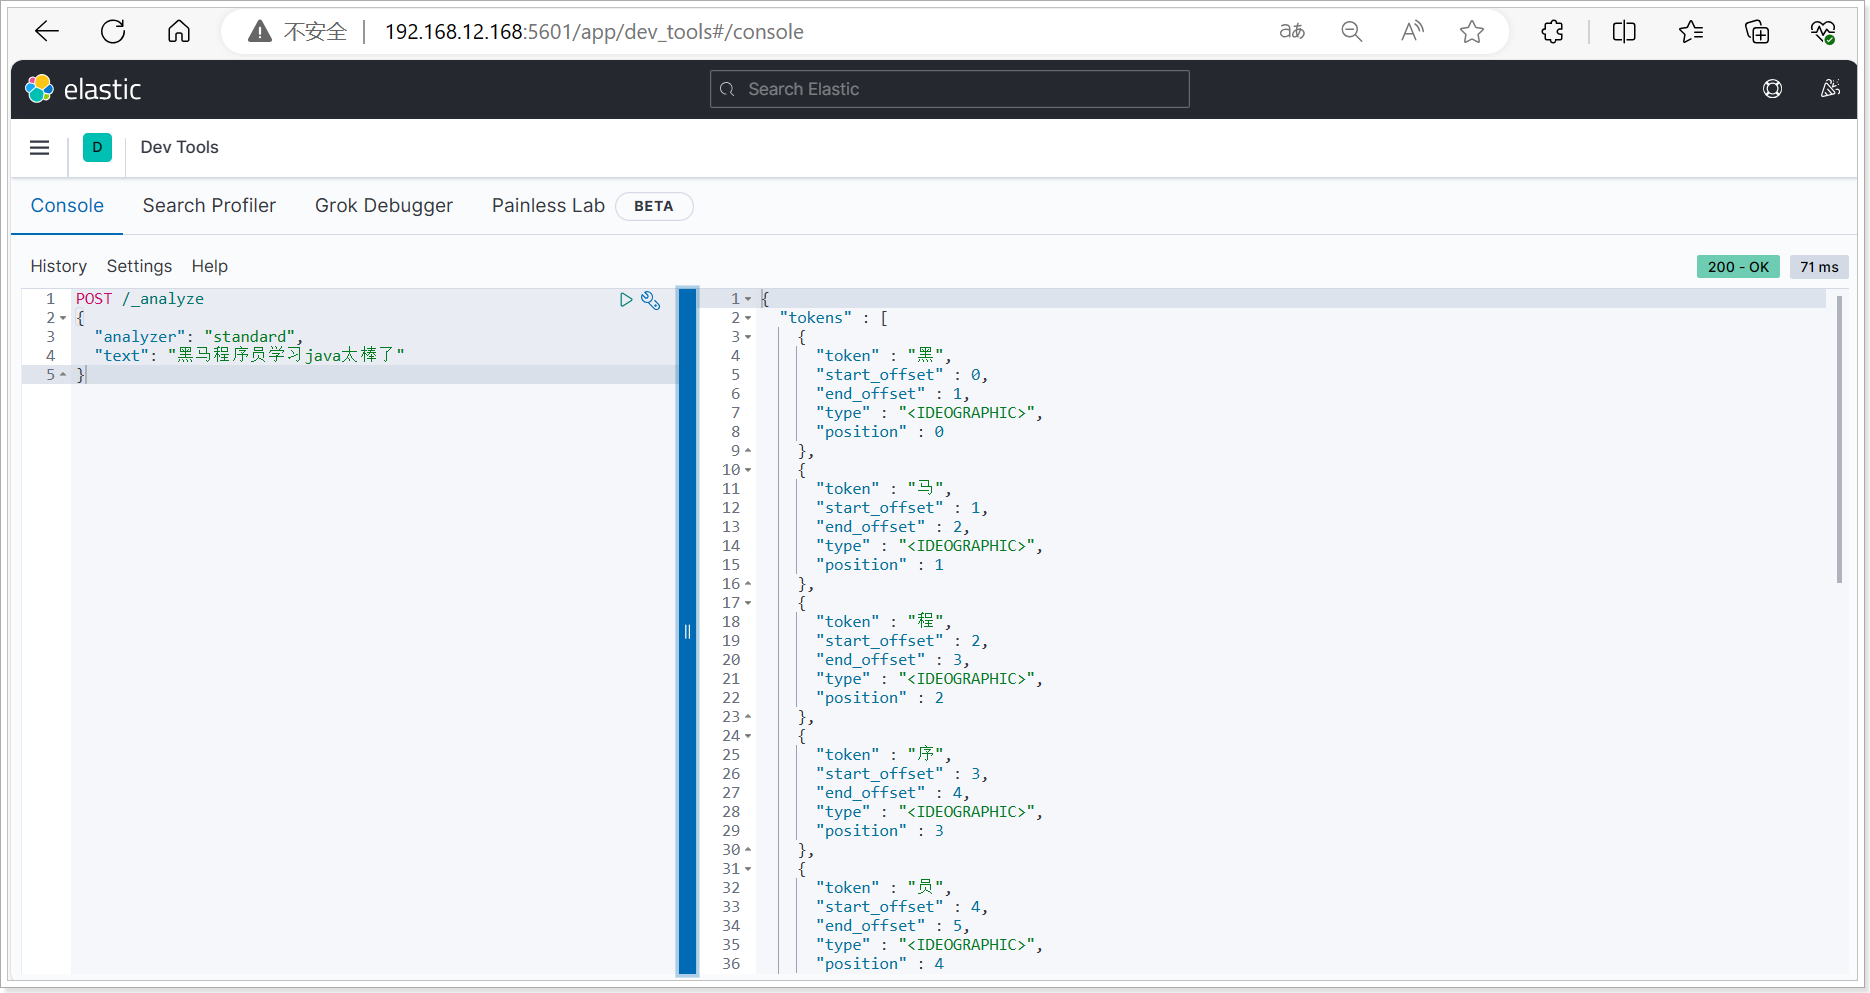
可以看到,标准分词器智能1字1词条,无法正确对中文做分词。
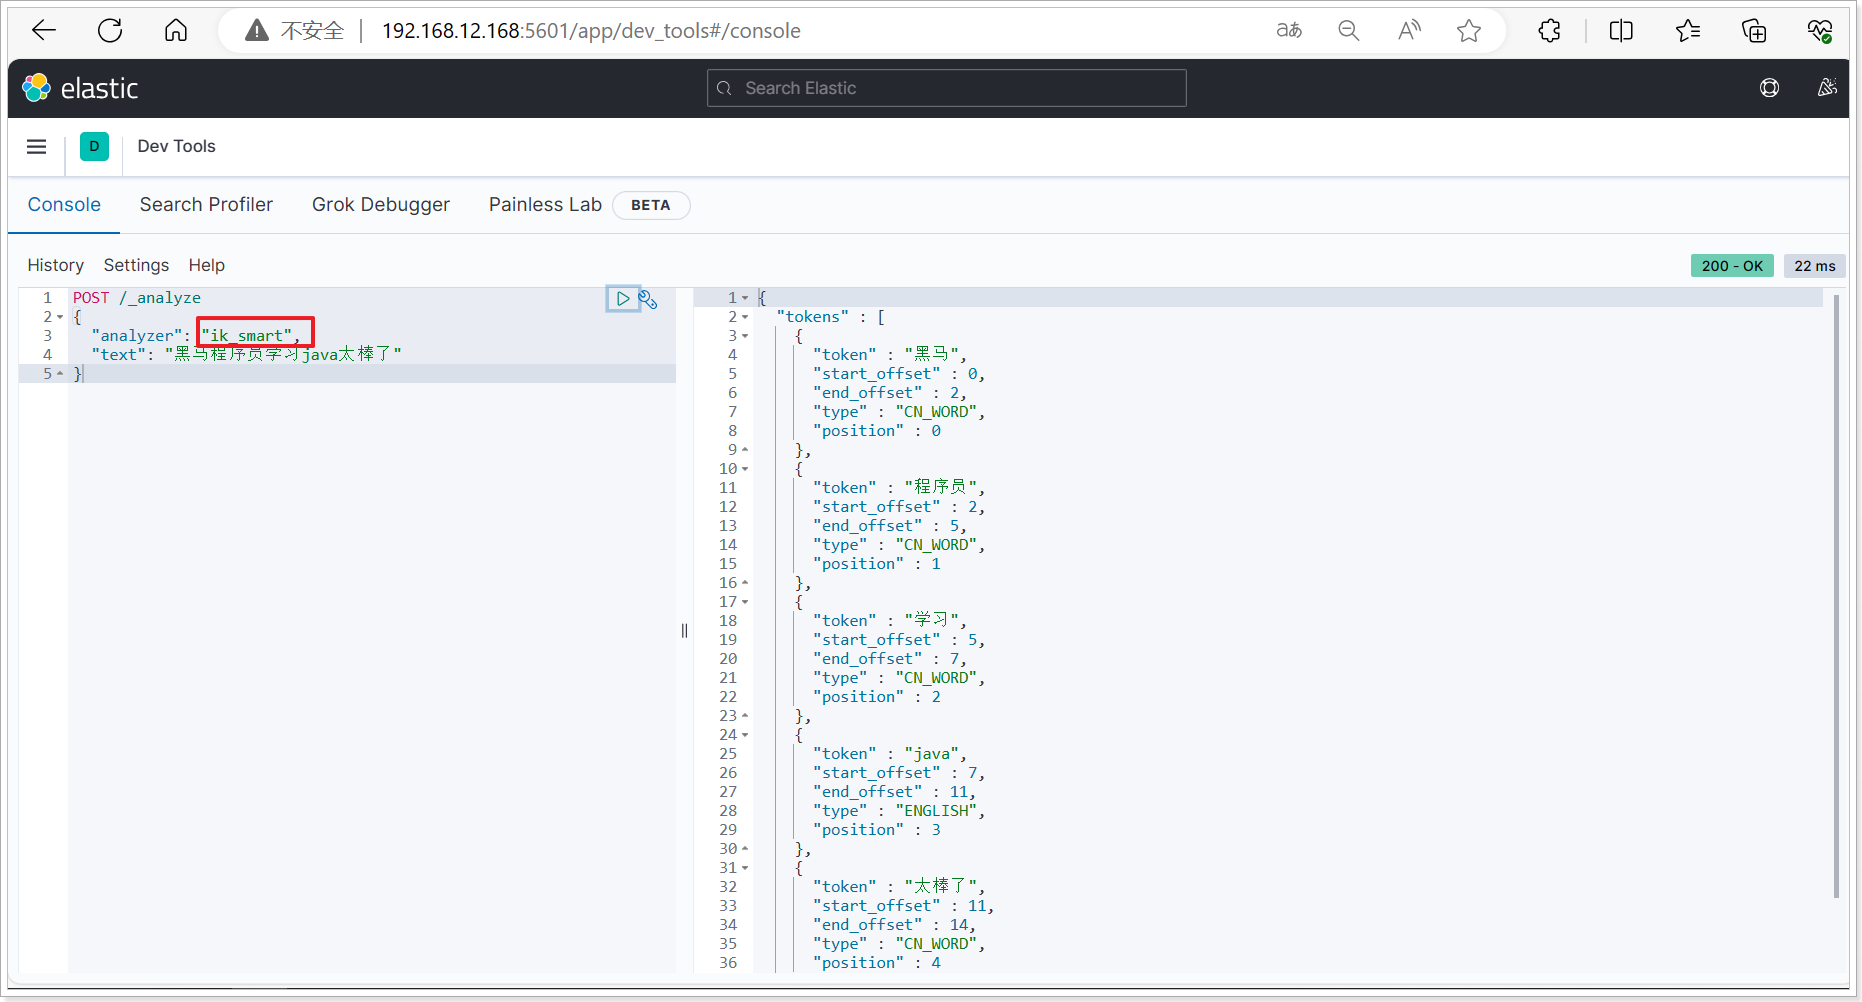
我们再测试IK分词器:
1
2
3
4
5
|
POST /_analyze
{
  "analyzer": "ik_smart",
  "text": "黑马程序员学习java太棒了"
}
|
结果如下图:
1.3.3、扩展词库
随着互联网的发展,“造词运动”也越发的频繁。出现了很多新的词语,在原有的词汇列表中并不存在。比如:“泰裤辣”,“传智播客” 等。
IK分词器无法对这些词汇分词,测试一下:
1
2
3
4
5
|
POST /_analyze
{
  "analyzer": "ik_max_word",
  "text": "传智播客开设大学,真的泰裤辣!"
}
|
结果如下:
 1
 2
 3
 4
 5
 6
 7
 8
 9
10
11
12
13
14
15
16
17
18
19
20
21
22
23
24
25
26
27
28
29
30
31
32
33
34
35
36
37
38
39
40
41
42
43
44
45
46
47
48
49
50
51
52
53
54
55
56
57
58
59
60
61
62
63
64
65
66
67
68
69
70
71
72
73
74
|
{
  "tokens" : [
    {
      "token" : "传",
      "start_offset" : 0,
      "end_offset" : 1,
      "type" : "CN_CHAR",
      "position" : 0
    },
    {
      "token" : "智",
      "start_offset" : 1,
      "end_offset" : 2,
      "type" : "CN_CHAR",
      "position" : 1
    },
    {
      "token" : "播",
      "start_offset" : 2,
      "end_offset" : 3,
      "type" : "CN_CHAR",
      "position" : 2
    },
    {
      "token" : "客",
      "start_offset" : 3,
      "end_offset" : 4,
      "type" : "CN_CHAR",
      "position" : 3
    },
    {
      "token" : "开设",
      "start_offset" : 4,
      "end_offset" : 6,
      "type" : "CN_WORD",
      "position" : 4
    },
    {
      "token" : "大学",
      "start_offset" : 6,
      "end_offset" : 8,
      "type" : "CN_WORD",
      "position" : 5
    },
    {
      "token" : "真的",
      "start_offset" : 9,
      "end_offset" : 11,
      "type" : "CN_WORD",
      "position" : 6
    },
    {
      "token" : "泰",
      "start_offset" : 11,
      "end_offset" : 12,
      "type" : "CN_CHAR",
      "position" : 7
    },
    {
      "token" : "裤",
      "start_offset" : 12,
      "end_offset" : 13,
      "type" : "CN_CHAR",
      "position" : 8
    },
    {
      "token" : "辣",
      "start_offset" : 13,
      "end_offset" : 14,
      "type" : "CN_CHAR",
      "position" : 9
    }
  ]
}
|
可以看到,传智播客和泰裤辣都无法正确分词。
所以要想正确分词,IK分词器的词库也需要不断的更新,IK分词器提供了扩展词汇的功能。
1)打开es中插件的挂载目录中IK分词器config目录:
注意,如果采用在线安装的通过,默认是没有config目录的,需要把课前资料提供的ik下的config上传至对应目录。
2)在IKAnalyzer.cfg.xml配置文件内容添加:
1
2
3
4
5
6
7
|
<?xml version="1.0" encoding="UTF-8"?>
<!DOCTYPE properties SYSTEM "http://java.sun.com/dtd/properties.dtd">
<properties>
        <comment>IK Analyzer 扩展配置</comment>
        <!--用户可以在这里配置自己的扩展字典 *** 添加扩展词典-->
        <entry key="ext_dict">ext.dic</entry>
</properties>
|
3)在IK分词器的config目录新建一个 ext.dic,可以参考config目录下复制一个配置文件进行修改
4)重启elasticsearch
1
2
3
4
|
docker restart es
# 查看 日志
docker logs -f es
|
再次测试,可以发现传智播客和泰裤辣都正确分词了:
1
2
3
4
5
6
7
8
9
10
11
12
13
14
15
16
17
18
19
20
21
22
23
24
25
26
27
28
29
30
31
32
33
34
35
36
37
38
39
|
{
"tokens" : [
{
"token" : "传智播客",
"start_offset" : 0,
"end_offset" : 4,
"type" : "CN_WORD",
"position" : 0
},
{
"token" : "开设",
"start_offset" : 4,
"end_offset" : 6,
"type" : "CN_WORD",
"position" : 1
},
{
"token" : "大学",
"start_offset" : 6,
"end_offset" : 8,
"type" : "CN_WORD",
"position" : 2
},
{
"token" : "真的",
"start_offset" : 9,
"end_offset" : 11,
"type" : "CN_WORD",
"position" : 3
},
{
"token" : "泰裤辣",
"start_offset" : 11,
"end_offset" : 14,
"type" : "CN_WORD",
"position" : 4
}
]
}
|
1.3.4、总结
分词器的作用是什么?
- 创建倒排索引时,对文档分词
- 用户搜索时,对输入的内容分词
IK分词器有几种模式?
ik_smart:智能切分,粗粒度ik_max_word:最细切分,细粒度
IK分词器如何拓展词条?如何停用词条?
- 利用config目录的
IkAnalyzer.cfg.xml文件添加拓展词典和停用词典的文件
- 在词典文件中添加拓展词条或者停用词条
1.4、基础概念
elasticsearch中有很多独有的概念,与mysql中略有差别,但也有相似之处。
1.4.1、文档和字段
elasticsearch是面向**文档(Document)**存储的,可以是数据库中的一条商品数据,一个订单信息。文档数据会被序列化为json格式后存储在elasticsearch中:
存储到 es 后结构类似:
1
2
3
4
5
6
7
8
9
10
11
12
13
14
15
16
17
18
19
20
|
{
"id": 1,
"title": "小米手机",
"price": 3499
}
{
"id": 2,
"title": "华为手机",
"price": 4999
}
{
"id": 3,
"title": "华为小米充电器",
"price": 49
}
{
"id": 4,
"title": "小米手环",
"price": 299
}
|
因此,原本数据库中的一行数据就是ES中的一个JSON文档;而数据库中每行数据都包含很多列,这些列就转换为JSON文档中的字段(Field)。
1.4.2、索引和映射
随着业务发展,需要在es中存储的文档也会越来越多,比如有商品的文档、用户的文档、订单文档等等:
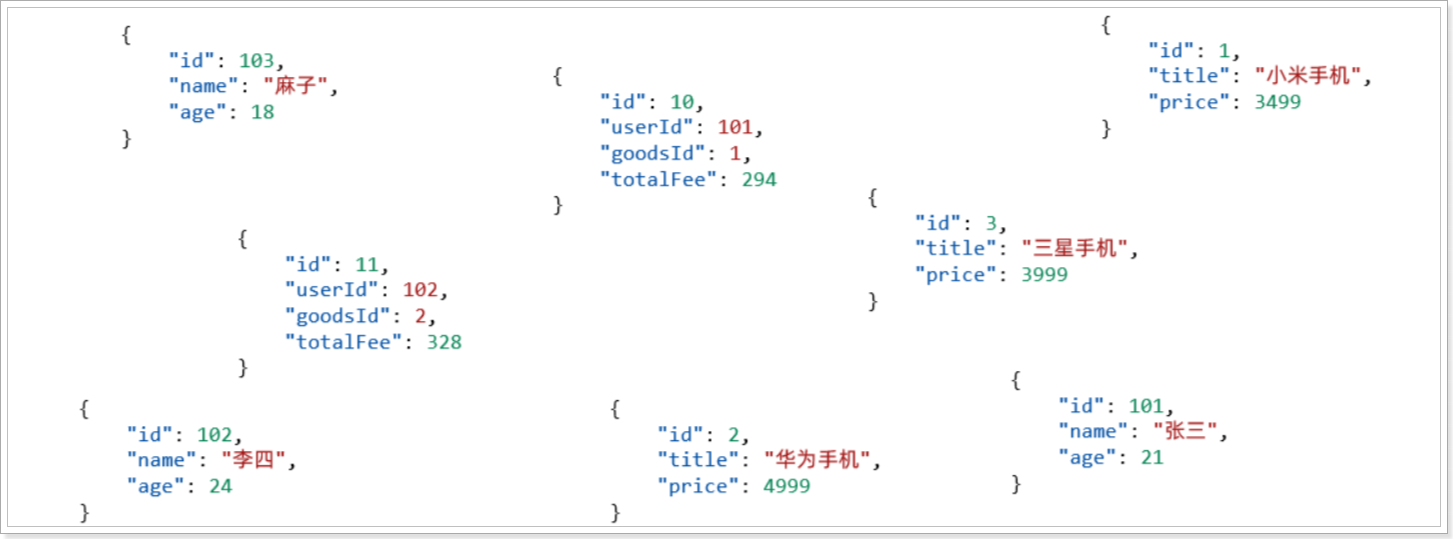
所有文档都散乱存放显然非常混乱,也不方便管理。
因此,我们要将类型相同的文档集中在一起管理,称为索引(Index)。例如:
-
商品索引
1
2
3
4
5
6
7
8
9
10
11
12
13
14
15
|
{
"id": 1,
"title": "小米手机",
"price": 3499
}
{
"id": 2,
"title": "华为手机",
"price": 4999
}
{
"id": 3,
"title": "三星手机",
"price": 3999
}
|
-
用户索引
1
2
3
4
5
6
7
8
9
10
11
12
13
14
15
|
{
"id": 101,
"name": "张三",
"age": 21
}
{
"id": 102,
"name": "李四",
"age": 24
}
{
"id": 103,
"name": "麻子",
"age": 18
}
|
-
订单索引
1
2
3
4
5
6
7
8
9
10
11
12
|
{
"id": 10,
"userId": 101,
"goodsId": 1,
"totalFee": 294
}
{
"id": 11,
"userId": 102,
"goodsId": 2,
"totalFee": 328
}
|
I 所有用户文档,就可以组织在一起,称为用户的索引;
II 所有商品的文档,可以组织在一起,称为商品的索引;
III 所有订单的文档,可以组织在一起,称为订单的索引;
因此,我们可以把索引当做是数据库中的表。
数据库的表会有约束信息,用来定义表的结构、字段的名称、类型等信息。因此,索引库中就有映射(mapping),是索引中文档的字段约束信息,类似表的结构约束。
1.4.3、MySQL与ElasticSearch
我们统一的把mysql与elasticsearch的概念做一下对比:
| MySQL |
Elasticsearch |
说明 |
| Table |
Index |
索引(index),就是文档的集合,类似数据库的表(table) |
| Row |
Document |
文档(Document),就是一条条的数据,类似数据库中的行(Row),文档都是JSON格式 |
| Column |
Field |
字段(Field),就是JSON文档中的字段,类似数据库中的列(Column) |
| Schema |
Mapping |
Mapping(映射)是索引中文档的约束,例如字段类型约束。类似数据库的表结构(Schema) |
| SQL |
DSL |
DSL是elasticsearch提供的JSON风格的请求语句,用来操作elasticsearch,实现CRUD |
如图:

那是不是说,我们学习了elasticsearch就不再需要mysql了呢?
并不是如此,两者各自有自己的擅长之处:
- Mysql:擅长事务类型操作,可以确保数据的安全和一致性
- Elasticsearch:擅长海量数据的搜索、分析、计算
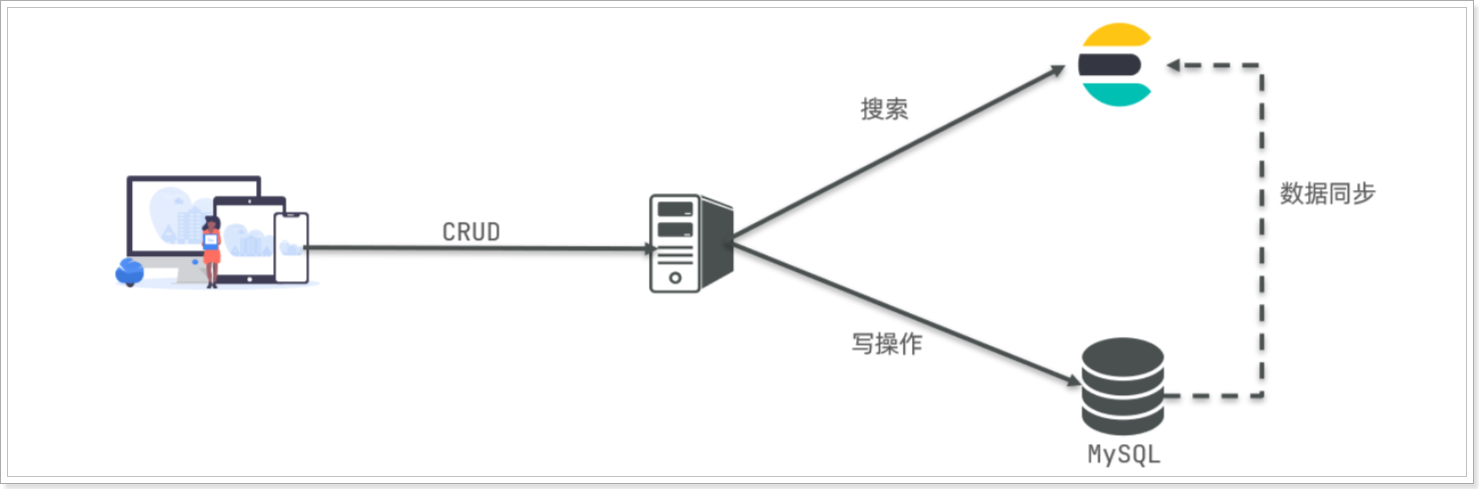
因此在企业中,往往是两者结合使用:
- 对安全性要求较高的写操作,使用mysql实现
- 对查询性能要求较高的搜索需求,使用elasticsearch实现
- 两者再基于某种方式,实现数据的同步,保证一致性
2、索引库操作
Index就类似数据库表,Mapping映射就类似表的结构。我们要向es中存储数据,必须先创建Index和Mapping。
2.1、Mapping映射属性
Mapping是对索引库中文档的约束,常见的Mapping属性包括:
type:字段数据类型,常见的简单类型有:
- 字符串:
text(可分词的文本)、keyword(精确值,例如:品牌、国家、ip地址)
- 数值:
long、integer、short、byte、double、float、
- 布尔:
boolean
- 日期:
date
- 对象:
object
index:是否创建索引,默认为trueanalyzer:使用哪种分词器properties:该字段的子字段
例如下面的json文档:
1
2
3
4
5
6
7
8
9
10
11
12
|
{
"age": 21,
"weight": 52.1,
"isMarried": false,
"info": "黑马程序员Java讲师",
"email": "zy@itcast.cn",
"score": [99.1, 99.5, 98.9],
"name": {
"firstName": "云",
"lastName": "赵"
}
}
|
对应的每个字段映射(Mapping):
| 字段名 |
字段类型 |
类型说明 |
是否参与搜索 |
是否参与分词 |
分词器 |
| age |
integer |
整数 |
是 |
否 |
—— |
| weight |
float |
浮点数 |
是 |
否 |
—— |
| isMarried |
boolean |
布尔 |
是 |
否 |
—— |
| info |
text |
字符串,但需要分词 |
是 |
是 |
IK |
| email |
keyword |
字符串,但是不分词 |
否 |
否 |
—— |
| score |
float |
只看数组中元素类型 |
是 |
否 |
—— |
| name.firstName |
keyword |
字符串,但是不分词 |
是 |
否 |
—— |
| name.lastName |
keyword |
字符串,但是不分词 |
是 |
否 |
—— |
2.2、索引库
由于Elasticsearch采用的是Restful风格的API,因此其请求方式和路径相对都比较规范,而且请求参数也都采用JSON风格。
我们直接基于Kibana的DevTools来编写请求做测试,由于有语法提示,会非常方便。
2.2.1、创建索引库和映射
基本语法:
- 请求方式:
PUT
- 请求路径:
/索引库名,可以自定义
- 请求参数:
mapping映射
格式:
1
2
3
4
5
6
7
8
9
10
11
12
13
14
15
16
17
18
19
20
21
22
23
|
PUT /索引库名称
{
"mappings": {
"properties": {
"字段名":{
"type": "text",
"analyzer": "ik_smart"
},
"字段名2":{
"type": "keyword",
"index": "false"
},
"字段名3":{
"properties": {
"子字段": {
"type": "keyword"
}
}
},
// ...略
}
}
}
|
示例:
1
2
3
4
5
6
7
8
9
10
11
12
13
14
15
16
17
18
19
20
21
22
23
24
25
|
PUT /heima
{
"mappings": {
"properties": {
"info":{
"type": "text",
"analyzer": "ik_smart"
},
"email":{
"type": "keyword",
"index": false
},
"name":{
"properties": {
"firstName":{
"type": "keyword"
},
"lastName":{
"type": "keyword"
}
}
}
}
}
}
|
2.2.2、查询索引库
基本语法:
- 请求方式:GET
- 请求路径:/索引库名
- 请求参数:无
格式:
示例:

2.2.3、修改索引库
倒排索引结构虽然不复杂,但是一旦数据结构改变(比如改变了分词器),就需要重新创建倒排索引,这简直是灾难。因此索引库一旦创建,无法修改mapping。
虽然无法修改mapping中已有的字段,但是却允许添加新的字段到mapping中,因为不会对倒排索引产生影响。因此修改索引库能做的就是向索引库中添加新字段,或者更新索引库的基础属性。
语法说明:
1
2
3
4
5
6
7
8
|
PUT /索引库名/_mapping
{
"properties": {
"新字段名":{
"type": "integer"
}
}
}
|
示例:
1
2
3
4
5
6
7
8
|
PUT /heima/_mapping
{
"properties":{
"age":{
"type": "integer"
}
}
}
|

2.2.4、删除索引库
语法:
- 请求方式:DELETE
- 请求路径:/索引库名
- 请求参数:无
格式:
示例:
2.2.5、小结
索引库操作有哪些?
- 创建索引库:PUT /索引库名
- 查询索引库:GET /索引库名
- 删除索引库:DELETE /索引库名
- 修改索引库,添加字段:PUT /索引库名/_mapping
可以看到,对索引库的操作基本遵循的Restful的风格,因此API接口非常统一,方便记忆。
3、文档操作
有了索引库,接下来就可以向索引库中添加数据了。
Elasticsearch中的数据其实就是JSON风格的文档。操作文档自然包括增、删、改、查等几种常见操作,我们分别来学习。
3.1、新增文档
语法:
1
2
3
4
5
6
7
8
9
|
POST /索引库名/_doc/文档id
{
"字段1": "值1",
"字段2": "值2",
"字段3": {
"子属性1": "值3",
"子属性2": "值4"
},
}
|
示例:
1
2
3
4
5
6
7
8
9
10
11
12
13
14
15
16
17
18
19
20
21
22
23
24
25
26
27
28
29
30
31
32
33
34
35
36
37
|
# 创建索引库
PUT /heima
{
"mappings": {
"properties": {
"info":{
"type": "text",
"analyzer": "ik_smart"
},
"email":{
"type": "keyword",
"index": false
},
"name":{
"properties": {
"firstName":{
"type": "keyword"
},
"lastName":{
"type": "keyword"
}
}
}
}
}
}
# 新增文档
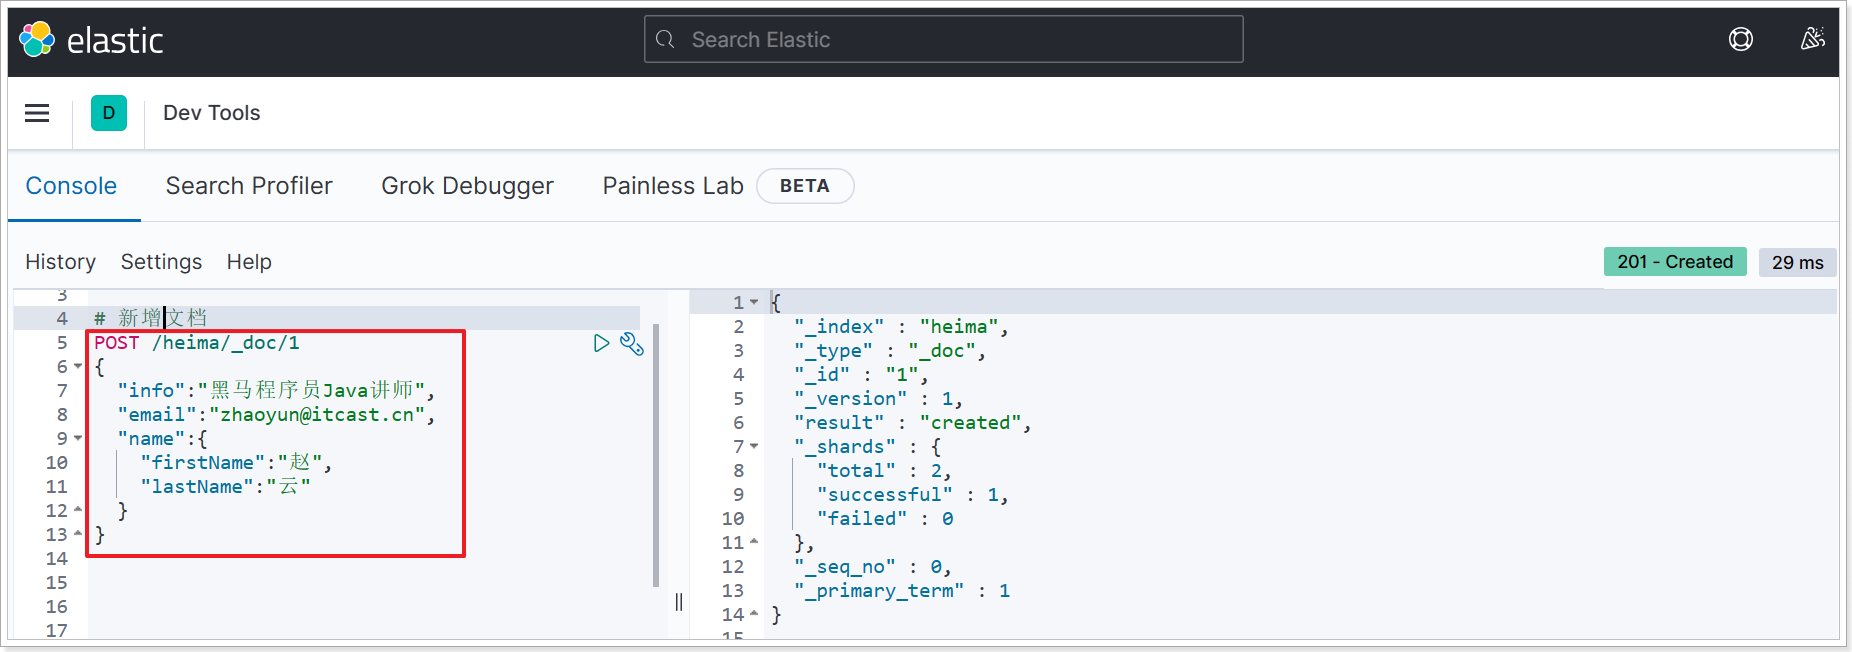
POST /heima/_doc/1
{
"info": "黑马程序员Java讲师",
"email": "zy@itcast.cn",
"name": {
"firstName": "云",
"lastName": "赵"
}
}
|
响应:
3.2、查询文档
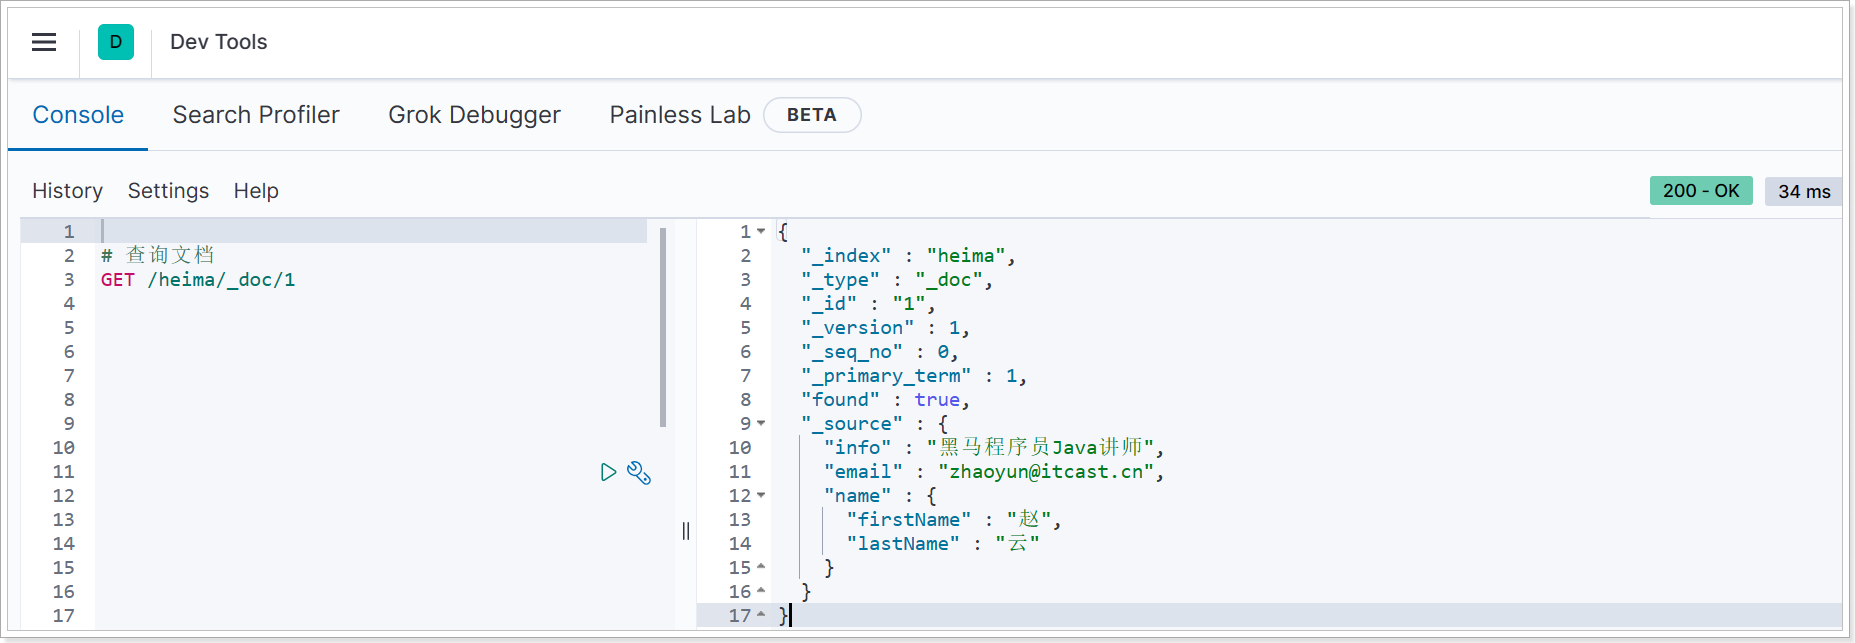
根据rest风格,新增是post,查询应该是get,不过查询一般都需要条件,这里我们把文档id带上。
语法:
示例:
查看结果:
3.3、删除文档
删除使用DELETE请求,同样,需要根据id进行删除:
语法:
1
|
DELETE /{索引库名}/_doc/id值
|
示例:
结果:

3.4、修改文档
修改有两种方式:
- 全量修改:直接覆盖原来的文档
- 局部修改:修改文档中的部分字段
3.4.1、全量修改
全量修改是覆盖原来的文档,其本质是两步操作:
注意:如果根据id删除时,id不存在,第二步的新增也会执行,也就从修改变成了新增操作了。
语法:
1
2
3
4
5
6
|
PUT /{索引库名}/_doc/文档id
{
"字段1": "值1",
"字段2": "值2",
// ... 略
}
|
示例:
1
2
3
4
5
6
7
8
9
|
PUT /heima/_doc/1
{
"info": "黑马程序员高级Java讲师",
"email": "zy@itcast.cn",
"name": {
"firstName": "云",
"lastName": "赵"
}
}
|
由于id为1的文档已经被删除,所以第一次执行时,得到的反馈是created:
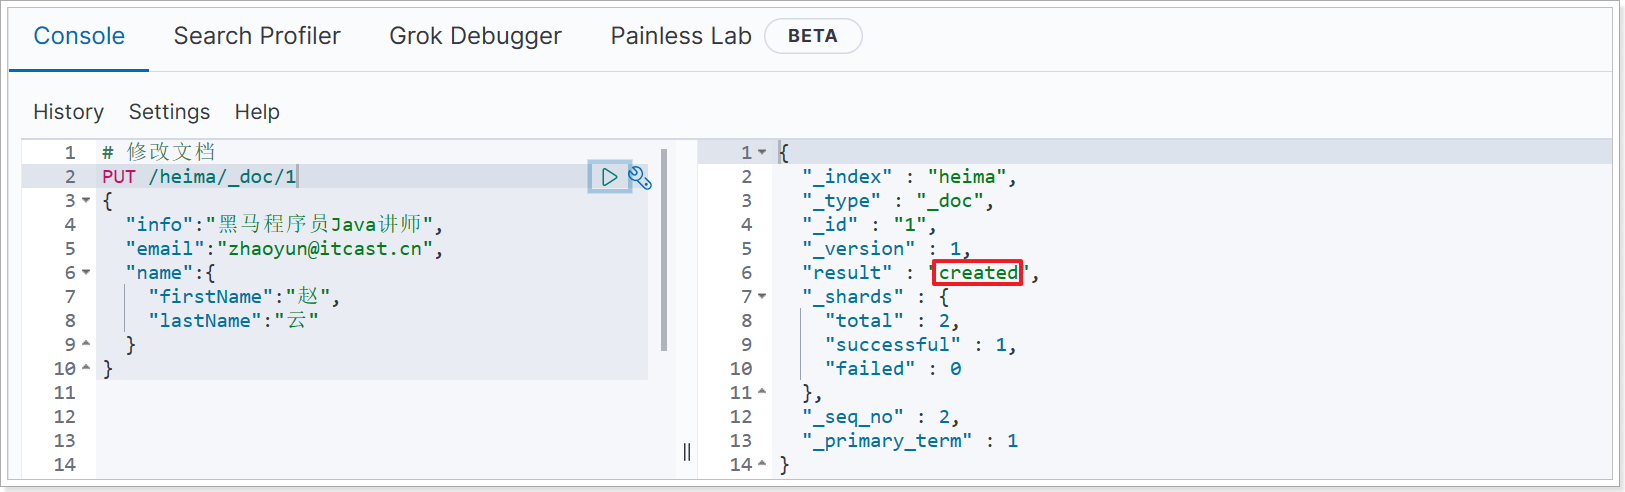
所以如果执行第2次时,得到的反馈则是updated:
3.4.2、局部修改
局部修改是只修改指定id匹配的文档中的部分字段。
语法:
1
2
3
4
5
6
|
POST /{索引库名}/_update/文档id
{
"doc": {
"字段名": "新的值",
}
}
|
示例:
1
2
3
4
5
6
|
POST /heima/_update/1
{
"doc":{
"email":"ZhaoYun@itcast.cn"
}
}
|
执行结果:
3.5、批处理
批处理采用POST请求,基本语法如下:
1
2
3
4
5
6
7
8
|
POST _bulk
{ "index" : { "_index" : "test", "_id" : "1" } }
{ "field1" : "value1" }
{ "delete" : { "_index" : "test", "_id" : "2" } }
{ "create" : { "_index" : "test", "_id" : "3" } }
{ "field1" : "value3" }
{ "update" : {"_id" : "1", "_index" : "test"} }
{ "doc" : {"field2" : "value2"} }
|
其中:
index代表新增操作
_index:指定索引库名_id指定要操作的文档id{ "field1" : "value1" }:则是要新增的文档内容
delete代表删除操作
_index:指定索引库名_id指定要操作的文档id
update代表更新操作
_index:指定索引库名_id指定要操作的文档id{ "doc" : {"field2" : "value2"} }:要更新的文档字段
注意:index 之后的数据要写在一行
示例,批量新增:
1
2
3
4
5
|
POST /_bulk
{"index":{"_index":"heima", "_id":3}}
{"info":"黑马程序员C++讲师", "email":"ww@itcast.cn","name":{"firstName":"王", "lastName":"五"}}
{"index":{"_index":"heima", "_id":4}}
{"info":"黑马程序员鸿蒙讲师", "email":"zs@itcast.cn","name":{"firstName":"张", "lastName":"三"}}
|
批量删除:
1
2
3
|
POST /_bulk
{"delete":{"_index":"heima", "_id":3}}
{"delete":{"_index":"heima", "_id":4}}
|
3.6、小结
文档操作有哪些?
-
创建文档:POST /{索引库名}/_doc/文档id { json文档 }
-
查询文档:GET /{索引库名}/_doc/文档id
-
删除文档:DELETE /{索引库名}/_doc/文档id
-
修改文档:
- 全量修改:
PUT /{索引库名}/_doc/文档id { json文档 }
- 局部修改:
POST /{索引库名}/_update/文档id { "doc": {字段}}
4、RestAPI
ES官方提供了各种不同语言的客户端,用来操作ES。这些客户端的本质就是组装DSL语句,通过http请求发送给ES。
官方文档地址:
https://www.elastic.co/guide/en/elasticsearch/client/index.html
由于ES目前最新版本是8.8,提供了全新版本的客户端,老版本的客户端已经被标记为过时。而我们采用的是7.12版本,因此只能使用老版本客户端:
然后选择7.12版本,HighLevelRestClient版本:
4.1、初始化RestClient
在elasticsearch提供的API中,与elasticsearch一切交互都封装在一个名为RestHighLevelClient的类中,必须先完成这个对象的初始化,建立与elasticsearch的连接。
4.1.1、添加依赖
对于es的操作演示;统一在 黑马商城的 item-service中进行;所以在hmall\item-service\pom.xml 添加如下依赖:
1
2
3
4
|
<dependency>
<groupId>org.elasticsearch.client</groupId>
<artifactId>elasticsearch-rest-high-level-client</artifactId>
</dependency>
|
因为SpringBoot默认的ES版本是7.17.10,所以我们需要覆盖默认的ES版本;在同一个文件也就是 pom.xml中再修改es的版本号:
1
2
3
4
5
|
<properties>
<maven.compiler.source>11</maven.compiler.source>
<maven.compiler.target>11</maven.compiler.target>
<elasticsearch.version>7.12.1</elasticsearch.version>
</properties>
|
4.1.2、初始化RestHighLevelClient
为了单元测试方便,我们创建一个测试类hmall\item-service\src\test\java\com\hmall\item\es\IndexTest.java,然后将初始化的代码编写在@BeforeEach方法中:
1
2
3
4
5
6
7
8
9
10
11
12
13
14
15
16
17
18
19
20
21
22
23
24
25
26
27
28
29
30
|
package com.hmall.item.es;
import org.apache.http.HttpHost;
import org.elasticsearch.client.RestClient;
import org.elasticsearch.client.RestHighLevelClient;
import org.junit.jupiter.api.AfterEach;
import org.junit.jupiter.api.BeforeEach;
import org.junit.jupiter.api.Test;
public class IndexTest {
private RestHighLevelClient client;
@BeforeEach
public void init() {
client = new RestHighLevelClient(
RestClient.builder(HttpHost.create("http://192.168.12.168:9200")));
}
//测试获取连接
@Test
public void testGetConnection() {
System.out.println(client);
}
@AfterEach
public void close() throws Exception {
client.close();
}
}
|
4.2、创建索引库
由于要实现对商品搜索,所以我们需要将商品添加到Elasticsearch中,不过需要根据搜索业务的需求来设定索引库结构,而不是一股脑的把MySQL数据写入Elasticsearch。
4.2.1、商品Mapping映射
搜索页面的效果如图所示:

实现搜索功能需要的字段包括三大部分:
- 搜索过滤字段
- 排序字段
- 展示字段
- 商品id:用于点击后跳转
- 图片地址
- 是否是广告推广商品
- 名称
- 价格
- 评价数量
- 销量
对应的商品表结构如下,索引库无关字段已经划掉:

结合数据库表结构,以上字段对应的mapping映射属性如下:
| 字段名 |
字段类型 |
类型说明 |
是否参与搜索 |
是否参与分词 |
分词器 |
| id |
long(keyword) |
长整数 |
是 |
否 |
—— |
| name |
text |
字符串,参与分词搜索 |
是 |
是 |
IK |
| price |
integer |
以分为单位,所以是整数 |
是 |
否 |
—— |
| stock |
integer |
库存,整数 |
是 |
否 |
—— |
| image |
keyword |
字符串,但是不分词 |
否 |
否 |
—— |
| category |
keyword |
字符串,但是不分词 |
是 |
否 |
—— |
| brand |
keyword |
字符串,但是不分词 |
是 |
否 |
—— |
| sold |
integer |
销量,整数 |
是 |
否 |
—— |
| commentCount |
integer |
评论数,整数 |
是 |
否 |
—— |
| isAD |
boolean |
布尔类型 |
是 |
否 |
—— |
| updateTime |
Date |
更新时间 |
是 |
否 |
—— |
因此,最终我们的索引库文档结构应该是这样:
 1
 2
 3
 4
 5
 6
 7
 8
 9
10
11
12
13
14
15
16
17
18
19
20
21
22
23
24
25
26
27
28
29
30
31
32
33
34
35
36
37
38
39
40
41
42
|
PUT /items
{
"mappings": {
"properties": {
"id":{
"type": "keyword"
},
"name":{
"type": "text",
"analyzer": "ik_max_word"
},
"price":{
"type": "integer"
},
"stock":{
"type": "integer"
},
"image":{
"type":"keyword",
"index": false
},
"category":{
"type": "keyword"
},
"brand":{
"type": "keyword"
},
"sold":{
"type": "integer"
},
"commentCount":{
"type": "integer"
},
"isAD":{
"type": "boolean"
},
"updateTime":{
"type": "date"
}
}
}
}
|
4.2.2、创建商品索引库
在 IndexTest 中新增创建索引库的代码如下:
 1
 2
 3
 4
 5
 6
 7
 8
 9
10
11
12
13
14
15
16
17
18
19
20
21
22
23
24
25
26
27
28
29
30
31
32
33
34
35
36
37
38
39
40
41
42
43
44
45
46
47
48
49
50
51
52
53
54
55
56
57
58
59
60
61
62
63
64
65
66
67
68
69
70
71
72
73
74
75
76
77
78
79
80
81
82
83
84
85
|
package com.hmall.item.es;
import org.apache.http.HttpHost;
import org.elasticsearch.client.RequestOptions;
import org.elasticsearch.client.RestClient;
import org.elasticsearch.client.RestHighLevelClient;
import org.elasticsearch.client.indices.CreateIndexRequest;
import org.elasticsearch.xcontent.XContentType;
import org.junit.jupiter.api.AfterEach;
import org.junit.jupiter.api.BeforeEach;
import org.junit.jupiter.api.Test;
public class IndexTest {
private static final String MAPPING_TEMPLATE = "{\n" +
" \"mappings\": {\n" +
" \"properties\": {\n" +
" \"id\":{\n" +
" \"type\": \"keyword\"\n" +
" },\n" +
" \"name\":{\n" +
" \"type\": \"text\",\n" +
" \"analyzer\": \"ik_max_word\"\n" +
" },\n" +
" \"price\":{\n" +
" \"type\": \"integer\"\n" +
" },\n" +
" \"stock\":{\n" +
" \"type\": \"integer\"\n" +
" },\n" +
" \"image\":{\n" +
" \"type\":\"keyword\",\n" +
" \"index\": false\n" +
" },\n" +
" \"category\":{\n" +
" \"type\": \"keyword\"\n" +
" },\n" +
" \"brand\":{\n" +
" \"type\": \"keyword\"\n" +
" },\n" +
" \"sold\":{\n" +
" \"type\": \"integer\"\n" +
" },\n" +
" \"commentCount\":{\n" +
" \"type\": \"integer\"\n" +
" },\n" +
" \"isAD\":{\n" +
" \"type\": \"boolean\"\n" +
" },\n" +
" \"updateTime\":{\n" +
" \"type\": \"date\"\n" +
" }\n" +
" }\n" +
" }\n" +
"}";
private RestHighLevelClient client;
@BeforeEach
public void init() {
client = new RestHighLevelClient(
RestClient.builder(HttpHost.create("http://192.168.12.168:9200")));
}
//测试获取连接
@Test
public void testGetConnection() {
System.out.println(client);
}
@AfterEach
public void close() throws Exception {
client.close();
}
//测试创建索引库 items
@Test
public void testCreateIndex() throws Exception {
//1、创建request对象
CreateIndexRequest request = new CreateIndexRequest("items");
//2、设置参数
request.source(MAPPING_TEMPLATE, XContentType.JSON);
//3、发送请求;client.indices() 包括对索引库的所有操作
client.indices().create(request, RequestOptions.DEFAULT);
}
}
|
代码分为三步:
- 1)创建Request对象。
- 因为是创建索引库的操作,因此Request是
CreateIndexRequest。
- 2)添加请求参数
- 其实就是Json格式的Mapping映射参数。因为json字符串很长,这里是定义了静态字符串常量
MAPPING_TEMPLATE,让代码看起来更加优雅。
- 3)发送请求
client.indices()方法的返回值是IndicesClient类型,封装了所有与索引库操作有关的方法。例如创建索引、删除索引、判断索引是否存在等
4.3、删除索引库
删除索引库的请求非常简单:
与创建索引库相比:
- 请求方式从PUT变为DELTE
- 请求路径不变
- 无请求参数
所以代码的差异,注意体现在Request对象上。流程如下:
- 1)创建Request对象。这次是DeleteIndexRequest对象
- 2)准备参数。这里是无参,因此省略
- 3)发送请求。改用delete方法
在item-service中的IndexTest测试类中,编写单元测试,实现删除索引:
1
2
3
4
5
6
7
8
|
//测试删除索引库 items
@Test
public void testDeleteIndex() throws Exception {
//1、创建删除索引库请求对象
DeleteIndexRequest request = new DeleteIndexRequest("items");
//2、发送请求
client.indices().delete(request, RequestOptions.DEFAULT);
}
|
4.4、判断索引库是否存在
判断索引库是否存在,本质就是查询,对应的请求语句是:
因此与删除的Java代码流程是类似的,流程如下:
- 1)创建Request对象。这次是GetIndexRequest对象
- 2)准备参数。这里是无参,直接省略
- 3)发送请求。改用exists方法
1
2
3
4
5
6
7
8
9
|
//测试查询索引库items是否存在
@Test
public void testExistsIndex() throws Exception {
//1、创建查询索引库请求对象
GetIndexRequest request = new GetIndexRequest("items");
//2、发送请求
boolean exists = client.indices().exists(request, RequestOptions.DEFAULT);
System.out.println(exists?"索引库已经存在":"索引库不存在");
}
|
4.5、小结
RestClient操作elasticsearch的流程基本类似。核心是client.indices()方法来获取索引库的操作对象。
索引库操作的基本步骤:
- 初始化
RestHighLevelClient
- 创建XxxIndexRequest。XXX是
Create、Get、Delete
- 准备请求参数(
Create时需要,其它是无参,可以省略)
- 发送请求。调用
RestHighLevelClient#indices().xxx()方法,xxx是create、exists、delete
5、RestClient操作文档
5.1、文档操作测试类
索引库准备好以后,就可以操作文档了。为了与索引库操作分离,我们再次创建一个测试类,做两件事情:
- 初始化RestHighLevelClient
- 我们的商品数据在数据库,需要利用IItemService去查询,所以注入这个接口
编写 hmall\item-service\src\test\java\com\hmall\item\es\DocumentTest.java 内容如下:
 1
 2
 3
 4
 5
 6
 7
 8
 9
10
11
12
13
14
15
16
17
18
19
20
21
22
23
24
25
26
27
28
29
30
31
32
|
package com.hmall.item.es;
import com.hmall.item.service.IItemService;
import org.apache.http.HttpHost;
import org.elasticsearch.client.RestClient;
import org.elasticsearch.client.RestHighLevelClient;
import org.junit.jupiter.api.AfterEach;
import org.junit.jupiter.api.BeforeEach;
import org.springframework.beans.factory.annotation.Autowired;
import org.springframework.boot.test.context.SpringBootTest;
import java.io.IOException;
@SpringBootTest(properties = "spring.profiles.active=local")
public class DocumentTest {
private RestHighLevelClient client;
@Autowired
private IItemService itemService;
//初始化client
@BeforeEach
public void initClient() {
client = new RestHighLevelClient(
RestClient.builder(HttpHost.create("http://192.168.12.168:9200")));
}
//关闭client
@AfterEach
public void closeClient() throws IOException {
client.close();
}
}
|
5.2、新增文档
我们需要将数据库中的商品信息导入elasticsearch中,而不是造假数据了。
5.2.1、实体类ItemDoc
索引库结构与数据库结构还存在一些差异,因此我们要定义一个索引库结构对应的实体。
在item-service模块;新增 com.hmall.item.domain.po.ItemDoc 代码如下:
 1
 2
 3
 4
 5
 6
 7
 8
 9
10
11
12
13
14
15
16
17
18
19
20
21
22
23
24
25
26
27
28
29
30
31
32
33
34
|
package com.hmall.item.domain.po;
import io.swagger.annotations.ApiModel;
import io.swagger.annotations.ApiModelProperty;
import lombok.Data;
import java.time.LocalDateTime;
@Data
@ApiModel(description = "es索引库商品实体")
public class ItemDoc {
@ApiModelProperty("商品id")
private Long id;
@ApiModelProperty("SKU名称")
private String name;
@ApiModelProperty("价格(分)")
private Integer price;
@ApiModelProperty("库存数量")
private Integer stock;
@ApiModelProperty("商品图片")
private String image;
@ApiModelProperty("类目名称")
private String category;
@ApiModelProperty("品牌名称")
private String brand;
@ApiModelProperty("销量")
private Integer sold;
@ApiModelProperty("评论数")
private Integer commentCount;
@ApiModelProperty("是否是推广广告,true/false")
private Boolean isAD;
@ApiModelProperty("更新时间")
private LocalDateTime updateTime;
}
|
5.2.2、语法说明
新增文档的请求语法如下:
1
2
3
4
5
|
POST /{索引库名}/_doc/1
{
"name": "Jack",
"age": 21
}
|
对应的JavaAPI如下:
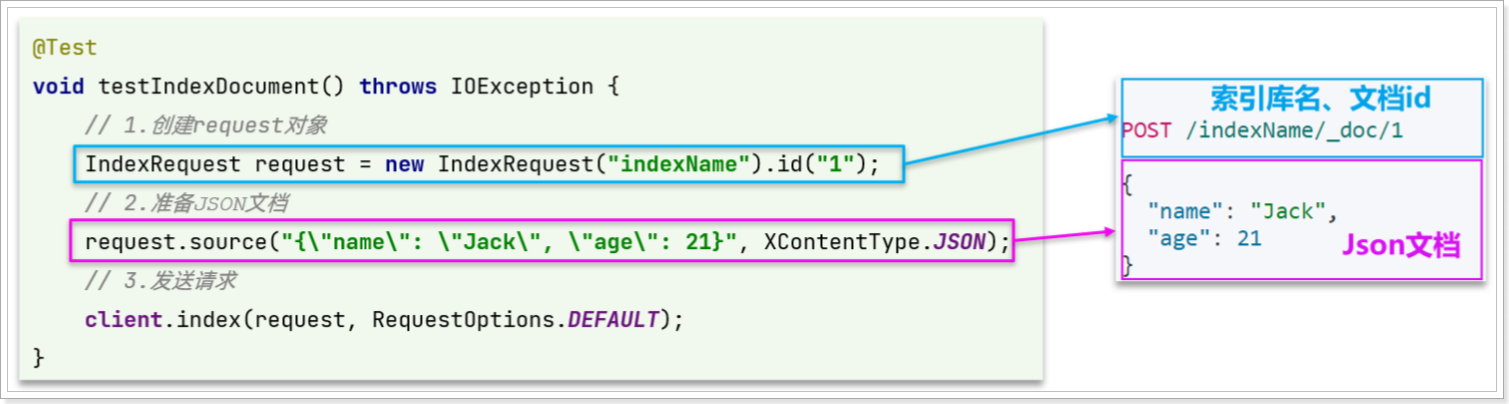
可以看到与索引库操作的API非常类似,同样是三步走:
- 1)创建Request对象,这里是
IndexRequest,因为添加文档就是创建倒排索引的过程
- 2)准备请求参数,本例中就是Json文档
- 3)发送请求
变化的地方在于,这里直接使用client.xxx()的API,不再需要client.indices()了。
5.2.3、新增商品文档
我们导入商品数据,除了参考API模板“三步走”以外,还需要做几点准备工作:
- 商品数据来自于数据库,我们需要先查询出来,得到
Item对象
Item对象需要转为ItemDoc对象ItemDoc需要序列化为json格式
因此,代码整体步骤如下:
- 1)根据id查询商品数据
Item
- 2)将
Item封装为ItemDoc并序列化为JSON
- 3)创建IndexRequest,指定索引库名和id
- 4)准备请求参数,也就是JSON文档
- 5)发送请求
在item-service的DocumentTest测试类中,编写单元测试:
 1
 2
 3
 4
 5
 6
 7
 8
 9
10
11
12
13
14
15
16
17
|
//新增商品文档到索引库items中
@Test
public void createDocument() throws IOException {
//1、根据商品id查询商品
Item item = itemService.getById(317578L);
//2、将商品转换为ItemDoc
ItemDoc itemDoc = BeanUtils.copyBean(item, ItemDoc.class);
//3、将ItemDoc转换为json字符串
String jsonStr = JSONUtil.toJsonStr(itemDoc);
//1、创建request
IndexRequest request = new IndexRequest("items").id(itemEsDTO.getId().toString());
//2、设置请求参数
request.source(jsonStr, XContentType.JSON);
//3、发送请求
client.index(request, RequestOptions.DEFAULT);
}
|
5.3、查询文档
我们以根据id查询文档为例
5.3.1、语法说明
查询的请求语句如下:
与之前的流程类似,代码大概分2步:
- 创建Request对象
准备请求参数,这里是无参,直接省略- 发送请求
示例代码如下:
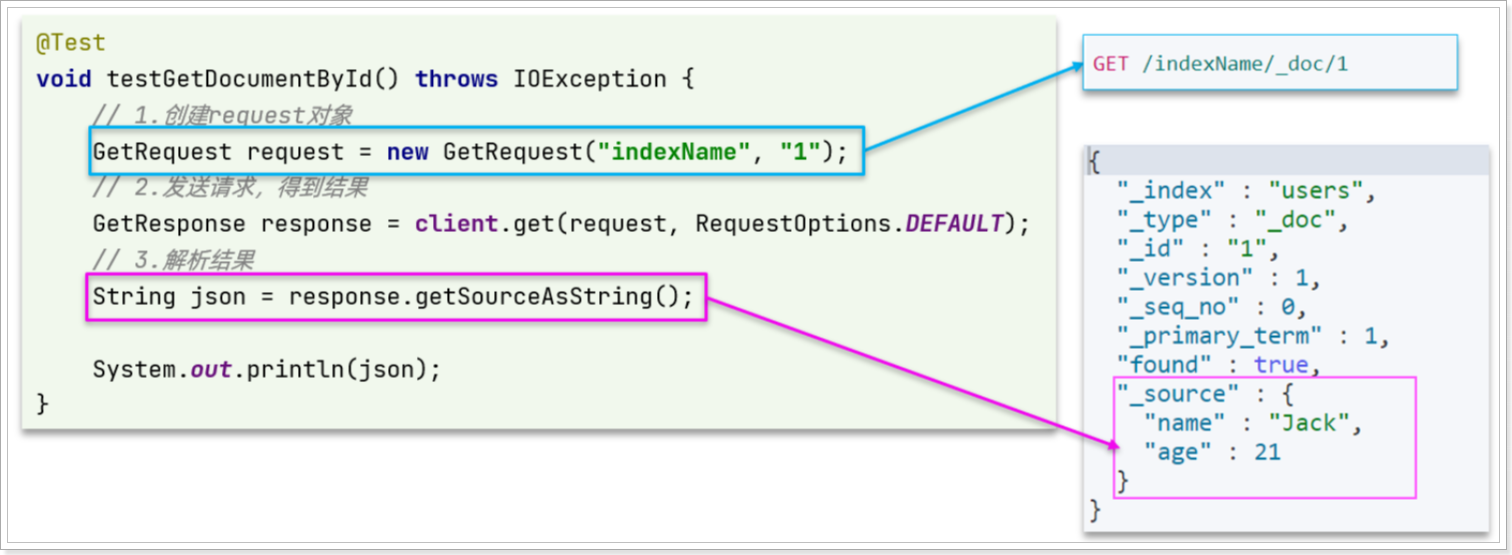
可以看到,响应结果是一个JSON,其中文档放在一个_source属性中,因此解析就是拿到_source,反序列化为Java对象即可。
其它代码与之前类似,流程如下:
- 1)准备Request对象。这次是查询,所以是
GetRequest
- 2)发送请求,得到结果。因为是查询,这里调用
client.get()方法
- 3)解析结果,就是对JSON做反序列化
5.3.2、查询商品
在item-service的DocumentTest测试类中,编写单元测试:
1
2
3
4
5
6
7
8
9
10
11
|
//根据id查询索引库items中的商品文档
@Test
public void getDocument() throws IOException {
//1、创建查询Request
GetRequest request = new GetRequest("items").id("317578");
//2、发送请求
GetResponse response = client.get(request, RequestOptions.DEFAULT);
//3、获取响应内容中的source(json字符串)
ItemDoc itemEsDTO = JSONUtil.toBean(response.getSourceAsString(), ItemDoc.class);
System.out.println(" itemEsDTO = " + itemEsDTO);
}
|
5.4、修改文档
修改我们讲过两种方式:
- 全量修改:本质是先根据id删除,再新增
- 局部修改:修改文档中的指定字段值
在RestClient的API中,全量修改与新增的API完全一致,判断依据是ID:
- 如果新增时,ID已经存在,则修改
- 如果新增时,ID不存在,则新增
这里不再赘述,我们主要关注局部修改的API即可。
5.4.1、语法说明
局部修改的请求语法如下:
1
2
3
4
5
6
7
|
POST /{索引库名}/_update/{id}
{
"doc": {
"字段名": "字段值",
"字段名": "字段值"
}
}
|
代码示例如图:
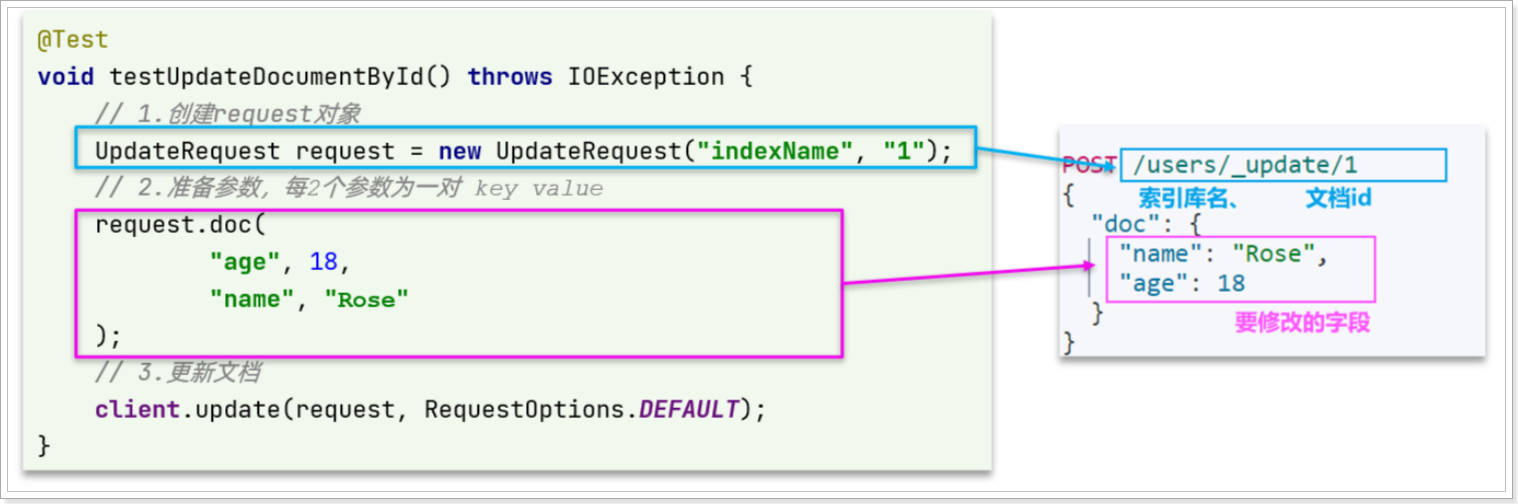
与之前类似,也是三步走:
- 1)准备
Request对象。这次是修改,所以是UpdateRequest
- 2)准备参数。也就是JSON文档,里面包含要修改的字段
- 3)更新文档。这里调用
client.update()方法
5.4.2、修改商品
在item-service的DocumentTest测试类中,编写单元测试:
1
2
3
4
5
6
7
8
9
10
|
//根据id修改商品文档到items索引库
@Test
public void updateDocument() throws IOException {
//1、创建修改请求
UpdateRequest request = new UpdateRequest("items", "317578");
//2、设置请求参数,修改商品属性
request.doc("price", 10000, "commentCount", 10);
//3、发送请求
client.update(request, RequestOptions.DEFAULT);
}
|
5.5、删除文档
删除的DSL请求语句如下:
1
|
DELETE /items/_doc/{id}
|
与查询相比,仅仅是请求方式从DELETE变成GET,可以想象Java代码应该依然是2步走:
- 1)准备Request对象,因为是删除,这次是
DeleteRequest对象。要指定索引库名和id
2)准备参数,无参,直接省略- 3)发送请求。因为是删除,所以是
client.delete()方法
在item-service的DocumentTest测试类中,编写单元测试:
1
2
3
4
5
6
7
8
|
//根据id删除索引库items中的商品文档
@Test
public void deleteDocument() throws IOException {
//1、创建删除请求
DeleteRequest request = new DeleteRequest("items").id("317578");
//2、发送请求
client.delete(request, RequestOptions.DEFAULT);
}
|
5.6、批量导入文档
在之前的案例中,我们都是操作单个文档。而数据库中的商品数据实际会达到数十万条,某些项目中可能达到数百万条。
我们如果要将这些数据导入索引库,肯定不能逐条导入,而是采用批处理方案。常见的方案有:
- 利用Logstash批量导入
- 需要安装Logstash
- 对数据的再加工能力较弱
- 无需编码,但要学习编写Logstash导入配置
- 利用JavaAPI批量导入
- 需要编码,但基于JavaAPI,学习成本低
- 更加灵活,可以任意对数据做再加工处理后写入索引库
接下来,我们就学习下如何利用JavaAPI实现批量文档导入。
5.6.1、语法说明
批处理与前面讲的文档的CRUD步骤基本一致:
- 创建Request,但这次用的是
BulkRequest
- 准备请求参数
- 发送请求,这次要用到
client.bulk()方法
BulkRequest本身其实并没有请求参数,其本质就是将多个普通的CRUD请求组合在一起发送。例如:
- 批量新增文档,就是给每个文档创建一个
IndexRequest请求,然后封装到BulkRequest中,一起发出。
- 批量删除,就是创建N个
DeleteRequest请求,然后封装到BulkRequest,一起发出
因此BulkRequest中提供了add方法,用以添加其它CRUD的请求:

可以看到,能添加的请求有:
IndexRequest,也就是新增UpdateRequest,也就是修改DeleteRequest,也就是删除
因此Bulk中添加了多个IndexRequest,就是批量新增功能了。示例:
1
2
3
4
5
6
7
8
9
10
|
@Test
void testBulk() throws IOException {
// 1.创建Request
BulkRequest request = new BulkRequest();
// 2.准备请求参数
request.add(new IndexRequest("items").id("1").source("json doc1", XContentType.JSON));
request.add(new IndexRequest("items").id("2").source("json doc2", XContentType.JSON));
// 3.发送请求
client.bulk(request, RequestOptions.DEFAULT);
}
|
5.6.2、完整代码
当我们要导入商品数据时,由于商品数量达到数十万,因此不可能一次性全部导入。建议采用循环遍历方式,每次导入1000条左右的数据。
item-service的DocumentTest测试类中,编写单元测试:
 1
 2
 3
 4
 5
 6
 7
 8
 9
10
11
12
13
14
15
16
17
18
19
20
21
22
23
24
25
26
27
28
29
30
31
32
33
34
35
|
//批量导入商品数据到es
@Test
public void importDocuments() throws IOException {
//循环查询商品数据;每次查询1000条数据并批量提交到es;
//页号
int pageNo = 1;
//页大小
int pageSize = 1000;
while (true) {
//分页查询状态为1的商品数据
Page<Item> page = itemService.lambdaQuery().eq(Item::getStatus, 1).page(new Page<>(pageNo, pageSize));
List<Item> itemList = page.getRecords();
if (CollUtils.isEmpty(itemList)) {
break;
}
//创建批量请求
BulkRequest bulkRequest = new BulkRequest();
for (Item item : itemList) {
//将商品转换为ItemDoc
ItemDoc itemEsDTO = BeanUtils.copyBean(item, ItemDoc.class);
//将ItemDoc转换为json字符串
String jsonStr = JSONUtil.toJsonStr(itemEsDTO);
//1、创建request
IndexRequest request = new IndexRequest("items").id(itemEsDTO.getId().toString());
//2、设置请求参数
request.source(jsonStr, XContentType.JSON);
//添加到批量请求中
bulkRequest.add(request);
}
//3、发送批量请求
client.bulk(bulkRequest, RequestOptions.DEFAULT);
//页号+1
pageNo++;
}
}
|
可以在Kibana上使用如下DSL查看索引库中文档数据
查询出来的总数可以与数据库中数据进行对比:
1
|
select count(*) from item where status = 1
|
5.7、小结
文档操作的基本步骤:
- 初始化
RestHighLevelClient
- 创建XxxRequest。
- XXX是
Index、Get、Update、Delete、Bulk
- 准备参数(
Index、Update、Bulk时需要)
- 发送请求。
- 调用
RestHighLevelClient#.xxx()方法,xxx是index、get、update、delete、bulk
- 解析结果(
Get时需要)
6、作业
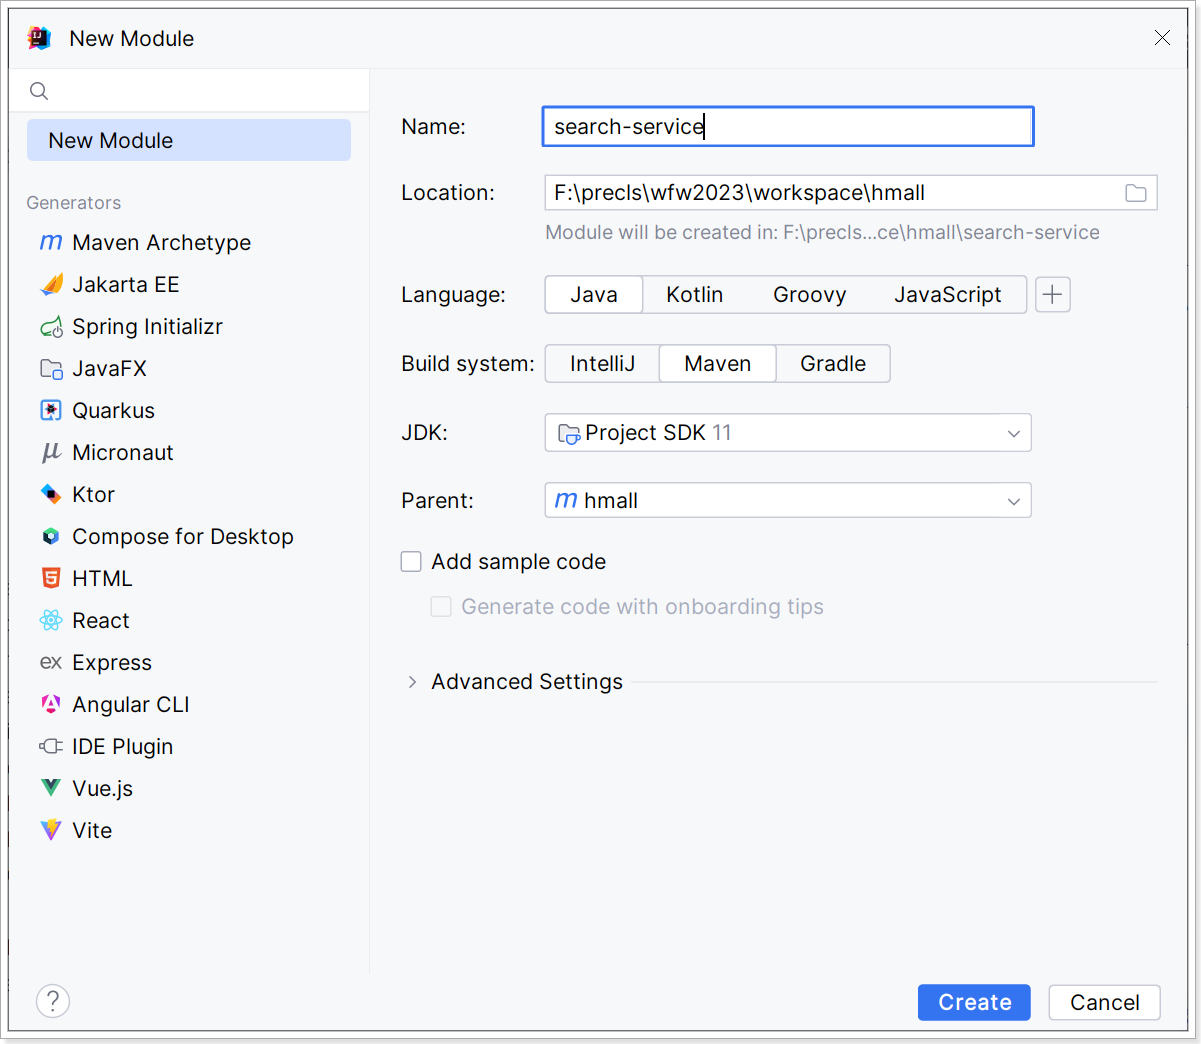
6.1、拆分搜索微服务
搜索业务并发压力可能会比较高,目前与商品服务在一起,不方便后期优化。
需求:创建一个新的微服务,命名为search-service搜索微服务,将搜索相关功能抽取到这个微服务中。
搜索微服务要对接的是es而不是mysql;所以抽取的时候要注意删除mysql相关的内容,添加es相关依赖。
搜索es中的数据还未讲到查询DSL;暂时不实现。
6.1.1、创建search-service
6.1.2、配置依赖
参考 item-service\pom.xml 修改 hmall\search-service\pom.xml 具体内容如下:
 1
 2
 3
 4
 5
 6
 7
 8
 9
10
11
12
13
14
15
16
17
18
19
20
21
22
23
24
25
26
27
28
29
30
31
32
33
34
35
36
37
38
39
40
41
42
43
44
45
46
47
48
49
50
51
52
53
54
55
56
57
58
59
60
61
62
63
64
65
66
67
68
69
70
71
72
73
74
75
76
77
|
<?xml version="1.0" encoding="UTF-8"?>
<project xmlns="http://maven.apache.org/POM/4.0.0"
xmlns:xsi="http://www.w3.org/2001/XMLSchema-instance"
xsi:schemaLocation="http://maven.apache.org/POM/4.0.0 http://maven.apache.org/xsd/maven-4.0.0.xsd">
<modelVersion>4.0.0</modelVersion>
<parent>
<groupId>com.heima</groupId>
<artifactId>hmall</artifactId>
<version>1.0.0</version>
</parent>
<artifactId>search-service</artifactId>
<properties>
<maven.compiler.source>11</maven.compiler.source>
<maven.compiler.target>11</maven.compiler.target>
<elastic.version>7.12.1</elastic.version>
</properties>
<dependencies>
<!--common-->
<dependency>
<groupId>com.heima</groupId>
<artifactId>hm-common</artifactId>
<version>1.0.0</version>
</dependency>
<dependency>
<groupId>com.heima</groupId>
<artifactId>hm-api</artifactId>
<version>1.0.0</version>
</dependency>
<!--web-->
<dependency>
<groupId>org.springframework.boot</groupId>
<artifactId>spring-boot-starter-web</artifactId>
</dependency>
<!--单元测试-->
<dependency>
<groupId>org.springframework.boot</groupId>
<artifactId>spring-boot-starter-test</artifactId>
</dependency>
<!--nacos 服务注册发现-->
<dependency>
<groupId>com.alibaba.cloud</groupId>
<artifactId>spring-cloud-starter-alibaba-nacos-discovery</artifactId>
</dependency>
<!--统一配置管理-->
<dependency>
<groupId>com.alibaba.cloud</groupId>
<artifactId>spring-cloud-starter-alibaba-nacos-config</artifactId>
</dependency>
<!--读取bootstrap文件-->
<dependency>
<groupId>org.springframework.cloud</groupId>
<artifactId>spring-cloud-starter-bootstrap</artifactId>
</dependency>
<dependency>
<groupId>org.elasticsearch.client</groupId>
<artifactId>elasticsearch-rest-high-level-client</artifactId>
</dependency>
<!-- spring amqp -->
<dependency>
<groupId>org.springframework.boot</groupId>
<artifactId>spring-boot-starter-amqp</artifactId>
</dependency>
</dependencies>
<build>
<finalName>${project.artifactId}</finalName>
<plugins>
<plugin>
<groupId>org.springframework.boot</groupId>
<artifactId>spring-boot-maven-plugin</artifactId>
</plugin>
</plugins>
</build>
</project>
|
6.1.3、启动引导类
右击 search-service 点击 JBLSpringBootAppGen生成启动引导类及其它包;
com.hmall.search.SearchApplication 的内容如下:
1
2
3
4
5
6
7
8
9
10
11
12
13
14
|
package com.hmall.search;
import com.hmall.api.config.DefaultFeignConfig;
import org.springframework.boot.SpringApplication;
import org.springframework.boot.autoconfigure.SpringBootApplication;
import org.springframework.cloud.openfeign.EnableFeignClients;
@EnableFeignClients(basePackages = "com.hmall.api.client", defaultConfiguration = DefaultFeignConfig.class)
@SpringBootApplication
public class SearchApplication {
public static void main(String[] args) {
SpringApplication.run(SearchApplication.class, args);
}
}
|
6.1.4、复制配置文件
复制其它微服务的配置文件,但是要删除数据库、sentinel、seata等配置。
创建 hmall\search-service\src\main\resources\application.yaml 内容如下:
1
2
3
4
5
6
7
8
9
10
|
server:
port: 8086
feign:
okhttp:
enabled: true # 开启OKHttp连接池支持
hm:
swagger:
title: 搜索服务接口文档
package: com.hmall.search.controller
|
创建 hmall\search-service\src\main\resources\bootstrap.yml 内容如下:
1
2
3
4
5
6
7
8
9
10
11
12
|
spring:
application:
name: search-service # 服务名称
cloud:
nacos:
server-addr: 192.168.12.168 # nacos地址
config:
file-extension: yaml # 文件后缀名
shared-configs: # 共享配置
- dataId: shared-log.yaml # 共享日志配置
- dataId: shared-swagger.yaml # 共享日志配置
- dataId: shared-mq.yaml # 共享mq配置
|
6.1.5、创建类
创建各种类后 search-service 的结构如下:
具体:
复制 hmall\item-service\src\main\java\com\hmall\item\domain\po\ItemDoc.java 到
hmall\search-service\src\main\java\com\hmall\search\domain\po\ItemDoc.java
创建 hmall\search-service\src\main\java\com\hmall\search\domain\query\ItemPageQuery.java内容如下:
 1
 2
 3
 4
 5
 6
 7
 8
 9
10
11
12
13
14
15
16
17
18
19
20
21
22
23
24
25
26
27
28
29
30
31
32
33
34
35
|
package com.hmall.search.domain.query;
import io.swagger.annotations.ApiModel;
import io.swagger.annotations.ApiModelProperty;
import lombok.Data;
import javax.validation.constraints.Min;
@Data
@ApiModel(description = "商品分页查询条件")
public class ItemPageQuery {
public static final Integer DEFAULT_PAGE_SIZE = 20;
public static final Integer DEFAULT_PAGE_NUM = 1;
@ApiModelProperty("页码")
@Min(value = 1, message = "页码不能小于1")
private Integer pageNo = DEFAULT_PAGE_NUM;
@ApiModelProperty("页码")
@Min(value = 1, message = "每页查询数量不能小于1")
private Integer pageSize = DEFAULT_PAGE_SIZE;
@ApiModelProperty("是否升序")
private Boolean isAsc = true;
@ApiModelProperty("排序方式")
private String sortBy;
@ApiModelProperty("搜索关键字")
private String key;
@ApiModelProperty("商品分类")
private String category;
@ApiModelProperty("商品品牌")
private String brand;
@ApiModelProperty("价格最小值")
private Integer minPrice;
@ApiModelProperty("价格最大值")
private Integer maxPrice;
}
|
创建 hmall\search-service\src\main\java\com\hmall\search\domain\vo\PageVO.java 内容如下:
1
2
3
4
5
6
7
8
9
10
11
12
13
14
15
16
17
18
19
20
21
22
23
24
25
26
27
|
package com.hmall.search.domain.vo;
import com.hmall.common.utils.CollUtils;
import lombok.AllArgsConstructor;
import lombok.Data;
import lombok.NoArgsConstructor;
import java.util.List;
@Data
@NoArgsConstructor
@AllArgsConstructor
public class PageVO<T> {
protected Long total;
protected Long pages;
protected List<T> list;
public static <T> PageVO<T> empty(Long total, Long pages) {
return new PageVO<>(total, pages, CollUtils.emptyList());
}
public static <T> PageVO<T> of(Long total, Long pages, List<T> list) {
return new PageVO<>(total, pages, list);
}
}
|
创建 com.hmall.search.service.ISearchService 内容如下:
1
2
3
4
|
package com.hmall.search.service;
public interface ISearchService {
}
|
创建 com.hmall.search.service.impl.SearchServiceImpl 内容如下:
1
2
3
4
5
6
7
8
|
package com.hmall.search.service.impl;
import com.hmall.search.service.ISearchService;
import org.springframework.stereotype.Service;
@Service
public class SearchServiceImpl implements ISearchService {
}
|
创建 com.hmall.search.controller.SearchController 内容如下:
1
2
3
4
5
6
7
8
9
10
11
12
13
14
15
16
17
18
19
20
21
22
23
24
25
26
27
28
29
|
package com.hmall.search.controller;
import com.hmall.search.domain.po.ItemDoc;
import com.hmall.search.domain.query.ItemPageQuery;
import com.hmall.search.domain.vo.PageVO;
import com.hmall.search.service.ISearchService;
import io.swagger.annotations.Api;
import io.swagger.annotations.ApiOperation;
import lombok.RequiredArgsConstructor;
import org.springframework.web.bind.annotation.GetMapping;
import org.springframework.web.bind.annotation.RequestMapping;
import org.springframework.web.bind.annotation.RestController;
@Api(tags = "搜索相关接口")
@RestController
@RequestMapping("/search")
@RequiredArgsConstructor
public class SearchController {
private final ISearchService searchService;
@ApiOperation("搜索商品")
@GetMapping("/list")
public PageVO<ItemDoc> search(ItemPageQuery query) {
// TODO 根据条件搜索es中商品
return PageVO.empty(0L, 0L);
}
}
|
6.1.6、配置网关
修改 hmall\hm-gateway\src\main\resources\application.yml 添加 search-service 路由如下:
6.2、商品查询接口
在item-service服务中提供一个根据id查询商品的功能,并编写对应的FeignClient。
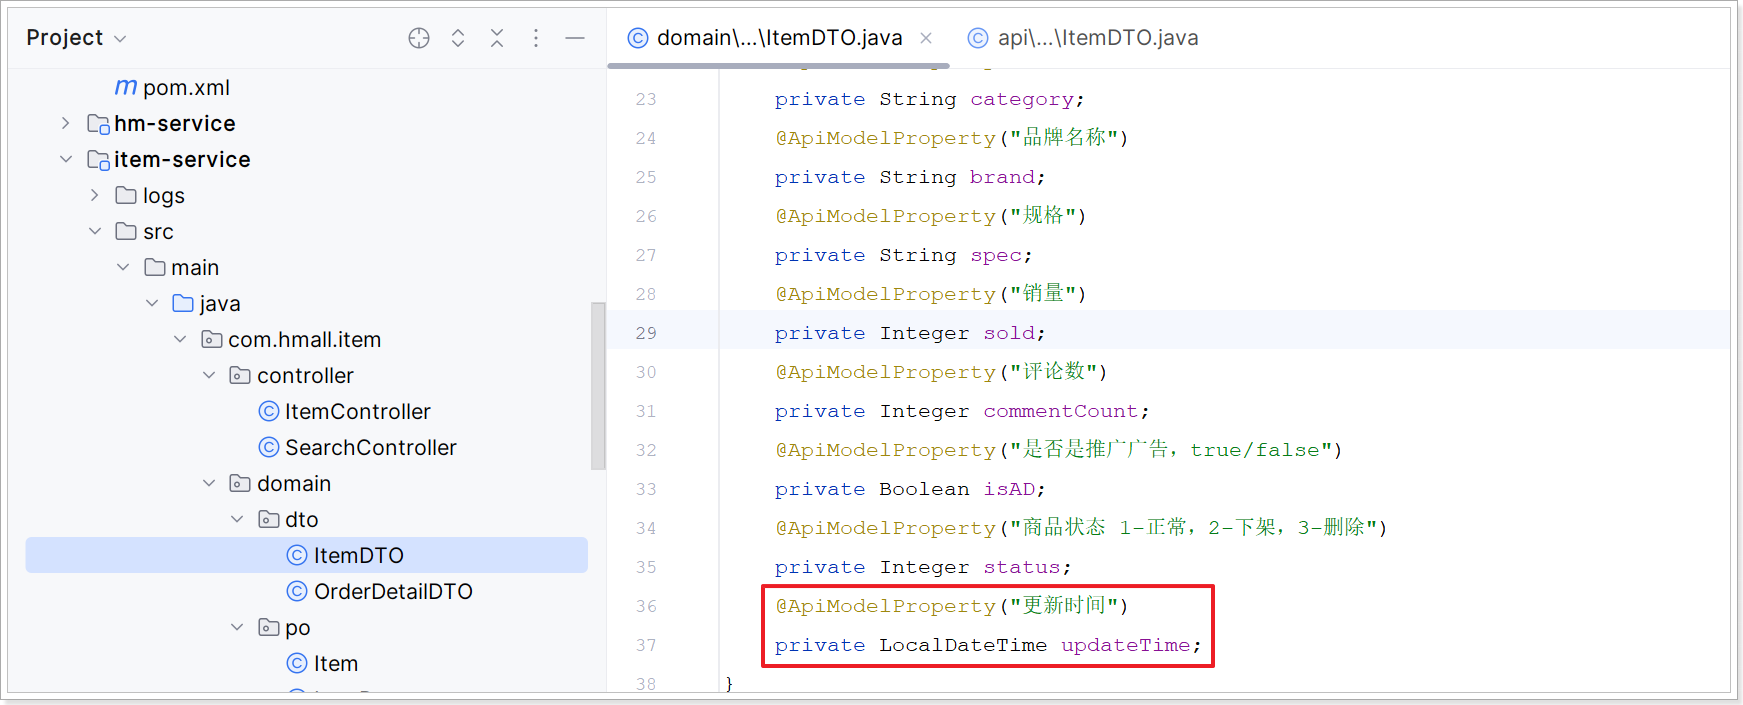
6.2.1、改造ItemDTO
修改 com.hmall.item.domain.dto.ItemDTO 和 com.hmall.api.dto.ItemDTO 两个 ItemDTO;在里面添加更新时间属性:
1
2
|
@ApiModelProperty("更新时间")
private LocalDateTime updateTime;
|
修改后:
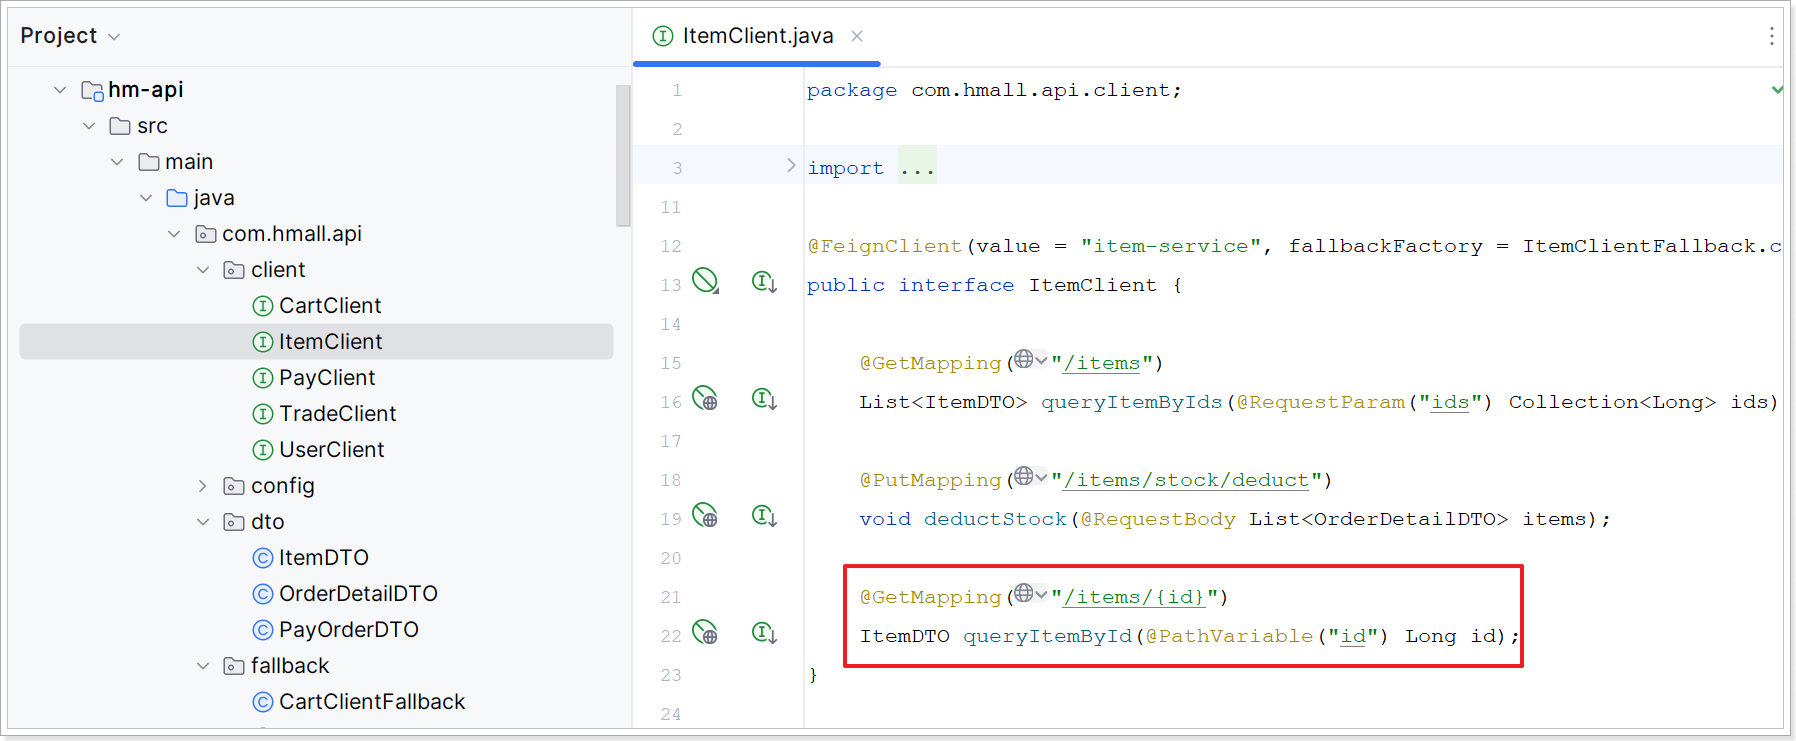
6.2.2、改造ItemClient
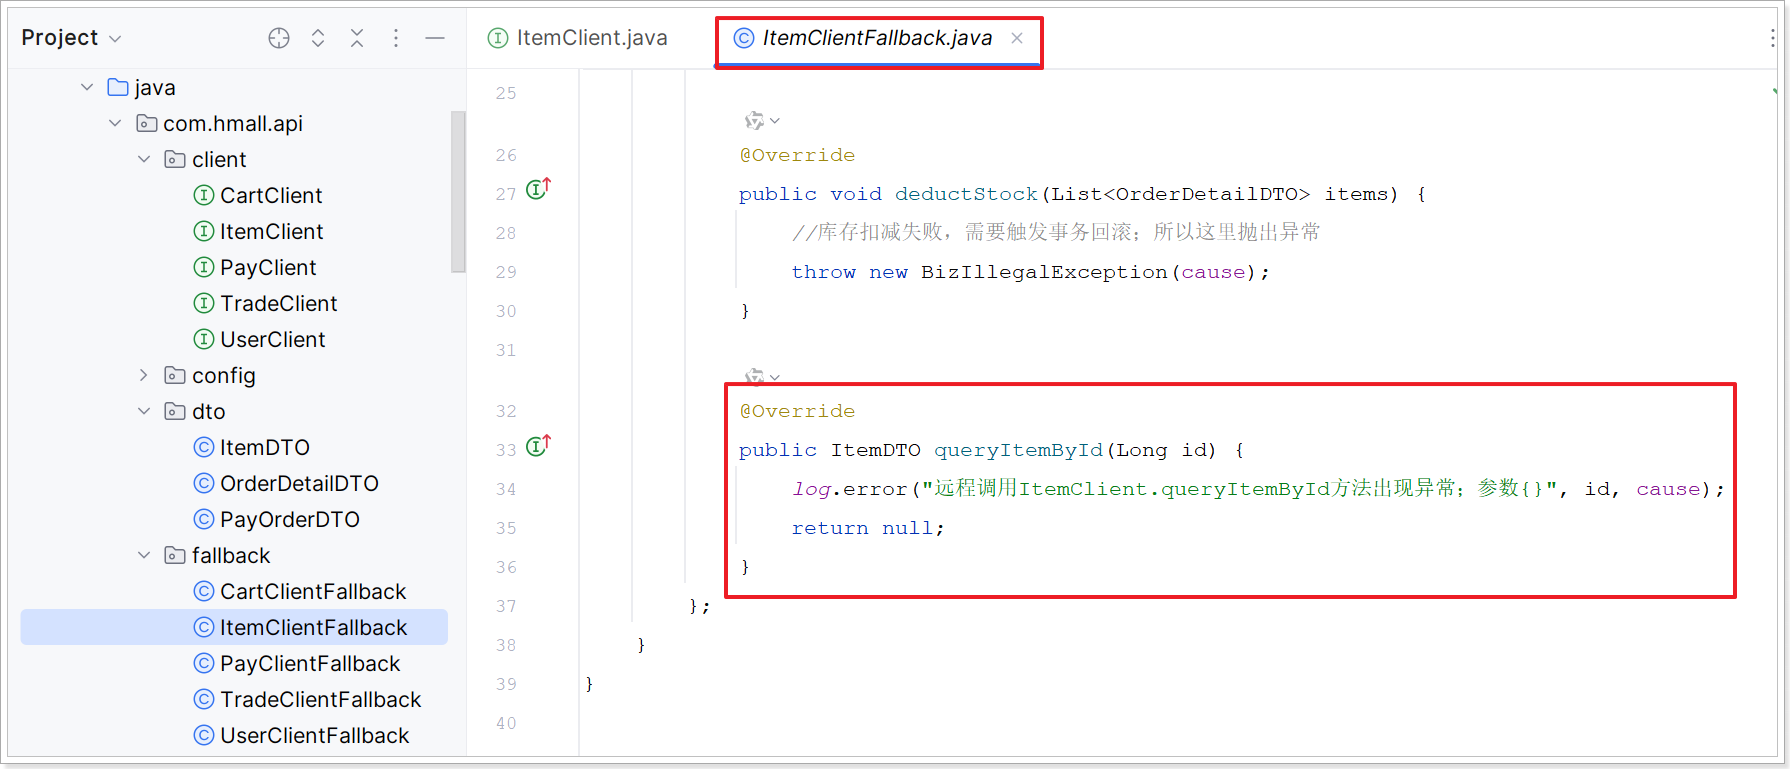
6.2.3、改造ItemClientFallback
6.3、数据同步
每当商品服务对商品实现上架时,发送RabbitMQ队列(交换机items.topic,路由key:item.up;队列search.item.up.queue)消息;新增索引库中的商品数据;
每当商品服务对商品实现下架时,发送RabbitMQ队列(交换机items.topic,路由key:item.down;队列search.item.down.queue)消息;删除索引库中的商品数据;
6.3.1、定义常量
在 com.hmall.common.constants.MqConstants 添加如下常量:
1
2
3
4
|
//商品上下架
public static final String ITEM_EXCHANGE_NAME = "items.topic";
public static final String ITEM_UP_KEY = "item.up";
public static final String ITEM_DOWN_KEY = "item.down";
|
6.3.2、发送消息
1)item-service整合MQ
item-service的pom.xml文件添加mq依赖如下:
1
2
3
4
|
<dependency>
<groupId>org.springframework.boot</groupId>
<artifactId>spring-boot-starter-amqp</artifactId>
</dependency>
|
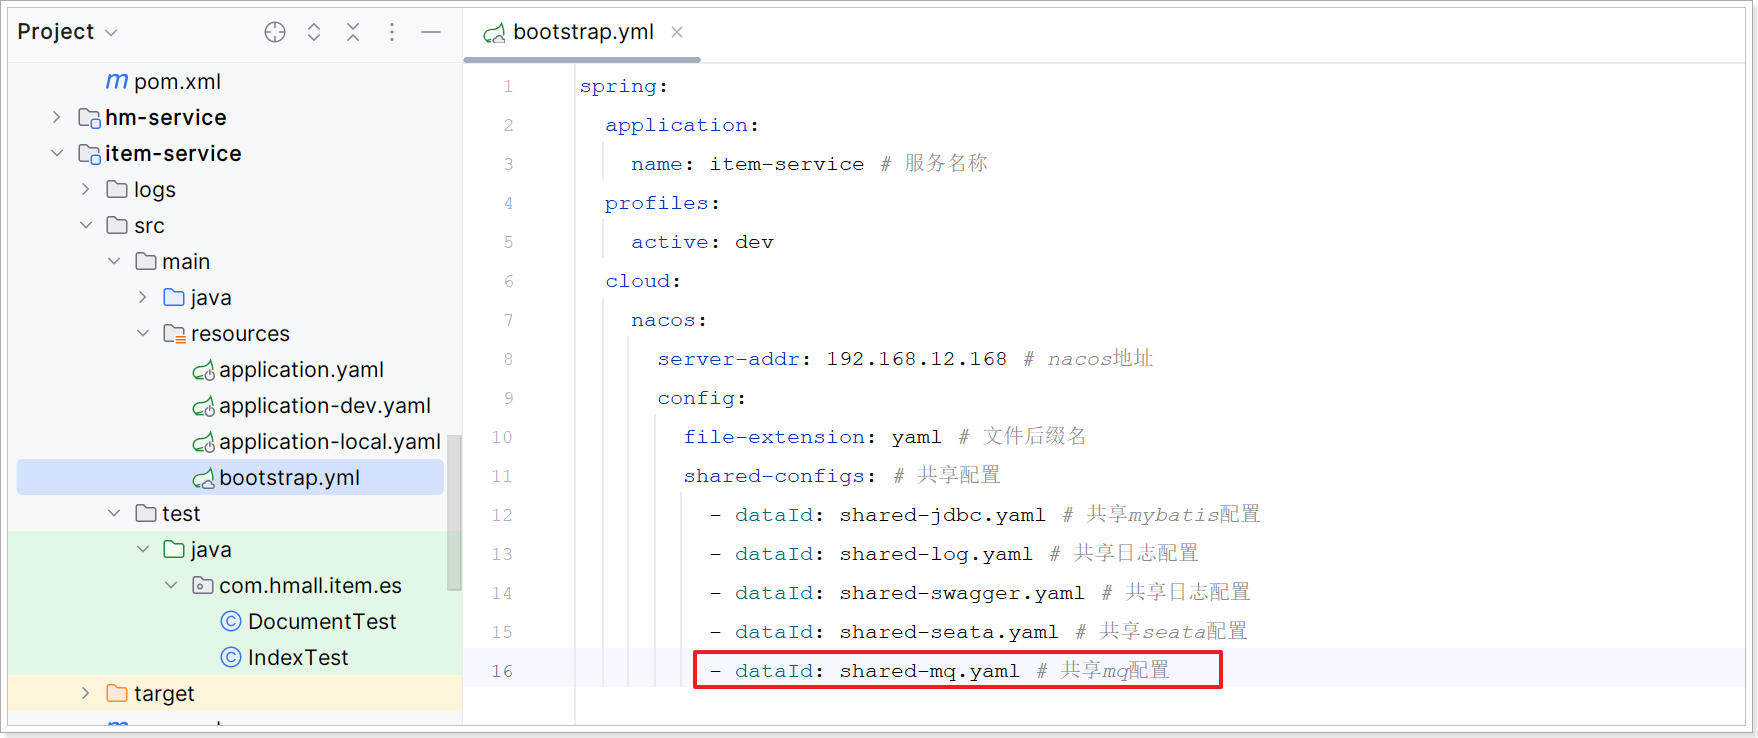
修改 bootstrap.yml 添加mq的配置如下:
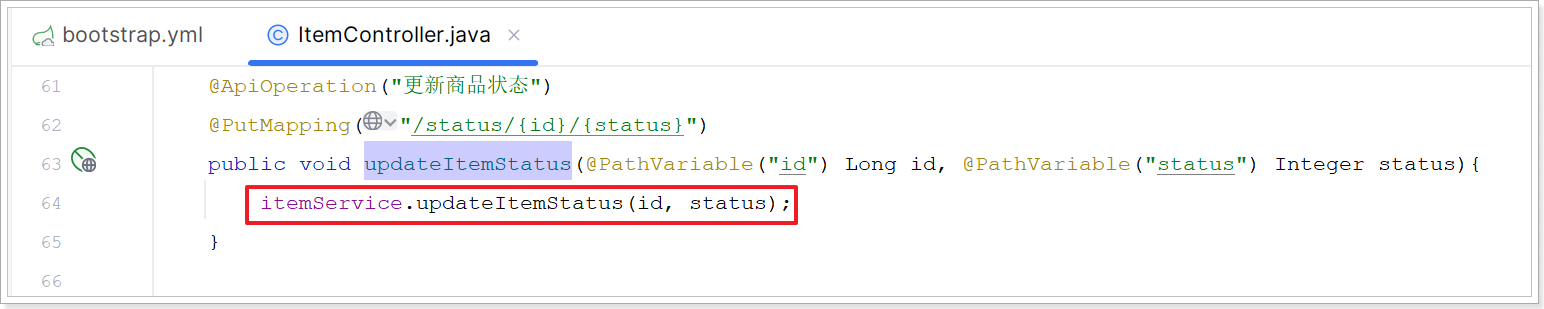
2)ItemController
改造 com.hmall.item.controller.ItemController#updateItemStatus
3)IItemService
新增 com.hmall.item.service.IItemService 如下方法:
1
2
|
//更新商品状态
void updateItemStatus(Long id, Integer status);
|
4)ItemServiceImpl
新增 com.hmall.item.service.impl.ItemServiceImpl 如下方法:
1
2
3
4
5
6
7
8
9
10
11
12
13
14
15
|
@Autowired
private RabbitTemplate rabbitTemplate;
@Override
public void updateItemStatus(Long id, Integer status) {
Item item = new Item();
item.setId(id);
item.setStatus(status);
this.updateById(item);
//1为上架,其它为下架
String routingKey = status == 1 ? MqConstants.ITEM_UP_KEY : MqConstants.ITEM_DOWN_KEY;
//发送消息
rabbitTemplate.convertAndSend(MqConstants.ITEM_EXCHANGE_NAME, routingKey, id);
}
|
6.3.3、监听上下架消息
创建 com.hmall.search.listener.ItemStatusListener 内容如下:
 1
 2
 3
 4
 5
 6
 7
 8
 9
10
11
12
13
14
15
16
17
18
19
20
21
22
23
24
25
26
27
28
29
30
31
32
33
34
35
36
37
38
|
package com.hmall.search.listener;
import com.hmall.common.constants.MqConstants;
import com.hmall.search.service.ISearchService;
import lombok.RequiredArgsConstructor;
import org.springframework.amqp.core.ExchangeTypes;
import org.springframework.amqp.rabbit.annotation.Exchange;
import org.springframework.amqp.rabbit.annotation.Queue;
import org.springframework.amqp.rabbit.annotation.QueueBinding;
import org.springframework.amqp.rabbit.annotation.RabbitListener;
import org.springframework.stereotype.Component;
@Component
@RequiredArgsConstructor
public class ItemStatusListener {
private final ISearchService searchService;
//监听商品上架消息
@RabbitListener(bindings = @QueueBinding(
value = @Queue(value = "search.item.up.queue", durable = "true"),
exchange = @Exchange(value = MqConstants.ITEM_EXCHANGE_NAME, type = ExchangeTypes.TOPIC),
key = MqConstants.ITEM_UP_KEY
))
public void onItemUpMessage(Long itemId) {
searchService.saveItemById(itemId);
}
//监听商品下架消息
@RabbitListener(bindings = @QueueBinding(
value = @Queue(value = "search.item.down.queue", durable = "true"),
exchange = @Exchange(value = MqConstants.ITEM_EXCHANGE_NAME, type = ExchangeTypes.TOPIC),
key = MqConstants.ITEM_DOWN_KEY
))
public void onItemDownMessage(Long itemId) {
searchService.deleteItemById(itemId);
}
}
|
6.3.4、更新ES商品
修改 com.hmall.search.service.ISearchService 如下:
1
2
3
4
5
6
7
|
package com.hmall.search.service;
public interface ISearchService {
void saveItemById(Long itemId);
void deleteItemById(Long itemId);
}
|
修改 com.hmall.search.service.impl.SearchServiceImpl 如下:
1
2
3
4
5
6
7
8
9
10
11
12
13
14
15
16
17
18
19
20
21
22
23
24
25
26
27
28
29
30
31
32
33
34
35
36
37
38
39
40
41
42
43
44
45
46
47
48
49
50
51
52
53
54
55
56
57
58
59
60
61
62
63
64
65
66
67
68
|
package com.hmall.search.service.impl;

import cn.hutool.json.JSONUtil;
import com.hmall.api.client.ItemClient;
import com.hmall.api.dto.ItemDTO;
import com.hmall.common.utils.BeanUtils;
import com.hmall.search.domain.po.ItemDoc;
import com.hmall.search.service.ISearchService;
import lombok.RequiredArgsConstructor;
import org.apache.http.HttpHost;
import org.elasticsearch.action.delete.DeleteRequest;
import org.elasticsearch.action.index.IndexRequest;
import org.elasticsearch.client.RequestOptions;
import org.elasticsearch.client.RestClient;
import org.elasticsearch.client.RestHighLevelClient;
import org.elasticsearch.xcontent.XContentType;
import org.springframework.beans.factory.annotation.Autowired;
import org.springframework.stereotype.Service;

import java.io.IOException;

@Service
public class SearchServiceImpl implements ISearchService {
    //索引库名称
    private static final String INDEX_NAME = "items";

    @Autowired
    private ItemClient itemClient;

    private RestHighLevelClient client;

    public SearchServiceImpl(){
        client = new RestHighLevelClient(RestClient.builder(HttpHost.create("http://192.168.12.168:9200")));
    }

    @Override
    public void saveItemById(Long itemId) {
        try {
            //1、根据商品id查询商品信息
            ItemDTO itemDTO = itemClient.queryItemById(itemId);
            if (itemDTO != null) {
                //2、转换为itemDoc json字符串
                ItemDoc itemDoc = BeanUtils.copyBean(itemDTO, ItemDoc.class);
                String jsonStr = JSONUtil.toJsonStr(itemDoc);
                //3、创建新增请求
                IndexRequest request = new IndexRequest(INDEX_NAME).id(itemDoc.getId().toString());
                //4、设置source参数
                request.source(jsonStr, XContentType.JSON);
                //5、发送请求
                client.index(request, RequestOptions.DEFAULT);
            }
        } catch (IOException e) {
            throw new RuntimeException("更新es中商品失败!参数:" + itemId, e);
        }
    }

    @Override
    public void deleteItemById(Long itemId) {
        try {
            //1、创建删除请求
            DeleteRequest deleteRequest = new DeleteRequest(INDEX_NAME, itemId.toString());
            //2、发送请求
            client.delete(deleteRequest, RequestOptions.DEFAULT);
        } catch (IOException e) {
            throw new RuntimeException("删除es中商品失败!参数:" + itemId, e);
        }
    }
}
|
6.3.5、测试
启动所有微服务;先到 kibana中查看目前商品总数:
然后再 商品管理 下架商品;之后再到kibana中查看总数是否跟着变化。上架也是类似。